


M3S Guide: Brute Bomber
Part 3 of 4 · AAC Light-heavyweight (Savage)
- Difficulty
- Savage
- Level
- 100
- Item level
- 710 – 730
- Party
- 8 (2T · 2H · 4D)
- Patch added
- 7.05
Brute Bomber hits hard and often, but almost every mechanic follows three reads: the cast name says spread or pairs, burning arms change the position, and your fuse timer sets your turn. Never use knockback immunity on the Barrage towers.
Before you pull
Strat overview, assignments, macro
JP PF Strat: Ride the Barrage knockbacks, Final Fusedown oriented to the lone long-fuse bomb, Fusefield scanned from north clockwise, and uptime positions for Fuse or Foe.
NA and western groups usually run Hector/NAUR: the same tower ride ("No KBI"), but Final Fusedown on true north with fixed ranged/healer spots, and Fusefield in MMRR order (also north clockwise). The PF description always wins: read it before joining.
Before joining a PF, confirm
- Lariat partner rotation and Dive pairs
- Barrage: ride the knockbacks or coordinated immunity
- Final Fusedown: JP relative north or a true-north diagram
- Fusefield order and who calls each pop
- Tank invuln for each Knuckle Sandwich
Unlock: Talk to Gabbro in Solution Nine after completing "The Neoteric Witch".
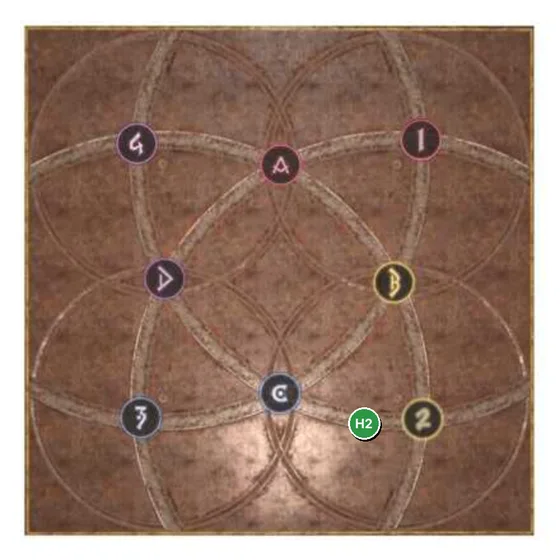
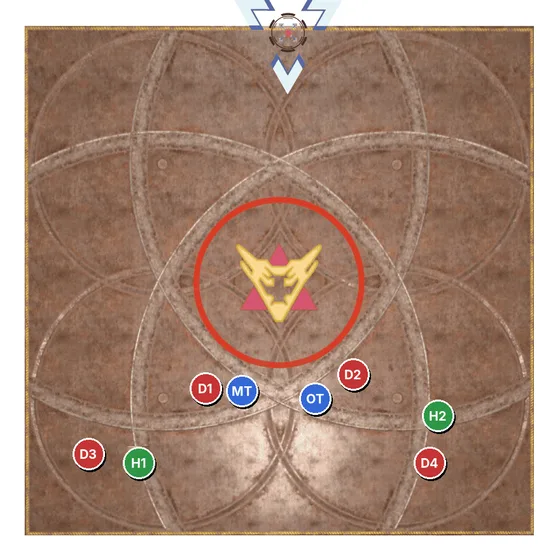
- Clock spread: N MT, NE D4, E H2, SE D2, S OT, SW D1, W H1, NW D3
- Lariat pairs: MT+D3 NW, H2+D4 NE, OT+D2 SE, H1+D1 SW
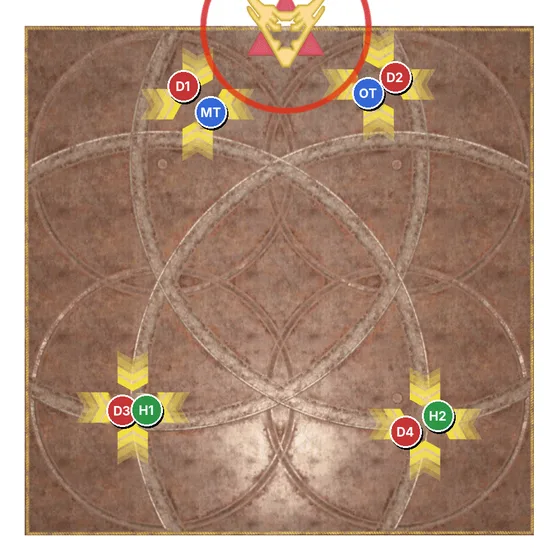
- Dive pairs (boss-relative): MT+D1, OT+D2, H1+D3, H2+D4
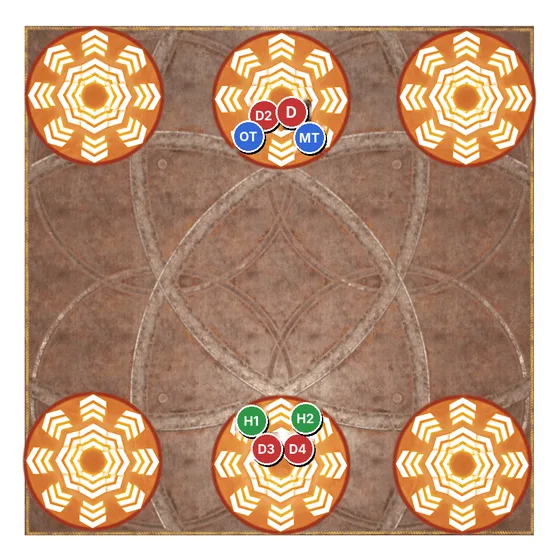
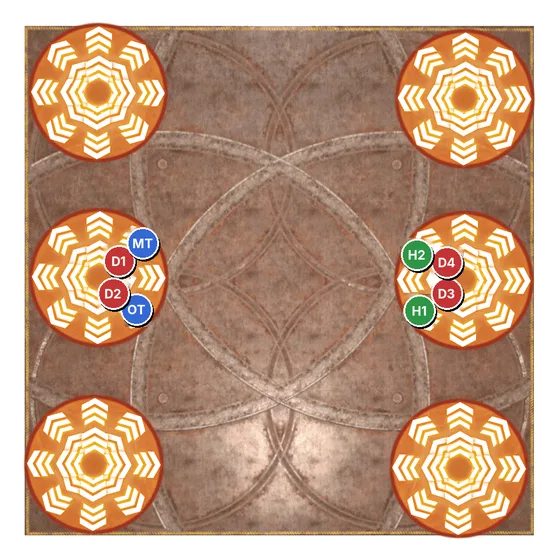
- Barrage: tanks/melee N or W, healers/ranged S or E; then G1 left, G2 right facing center
- Fusefield order: supports MT, OT, H1, H2; DPS D1, D2, D3, D4
- Brutal ImpactRaidwideMulti-hit raidwide. Mitigate the whole sequence.
- Knuckle SandwichTankbusterMulti-hit shared tankbuster, or a planned invuln.
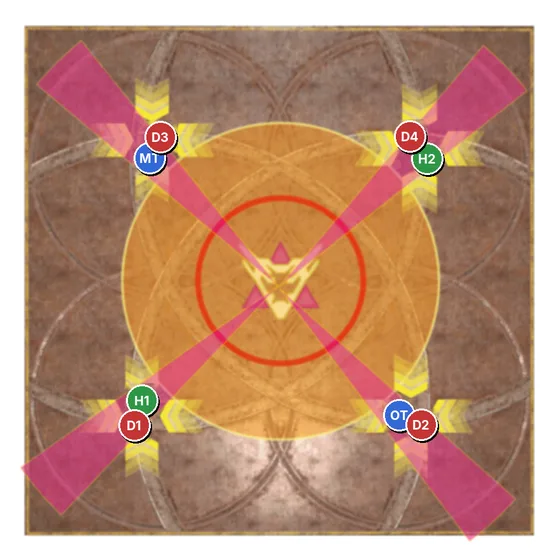
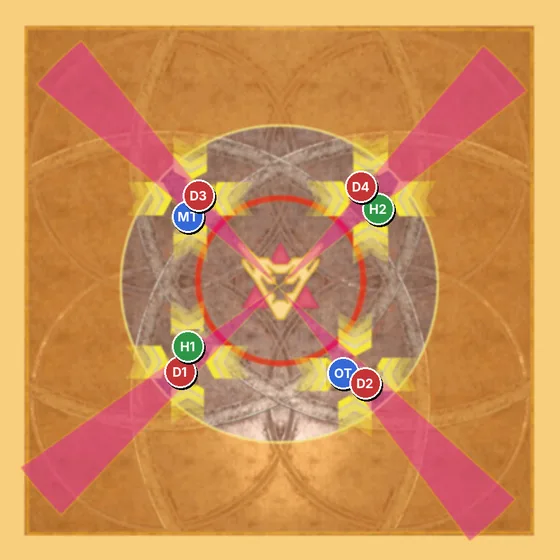
- Octuple / Quadruple LariatConesSpread (Octuple) or pairs (Quadruple). No fire = out; fire = in.
- Octoboom / Quadroboom DiveKnockbackJump, then spread or pairs. Fire = knockback; plan immunity or position.
- Barbarous BarrageKnockback4-player towers launch you to 2-player towers, then the 8-player center.
- Chain DeathmatchTetherTake the hit from your chained clone only, then dodge the return.
- Final FusedownSpreadShort and long personal bombs plus arena bombs.
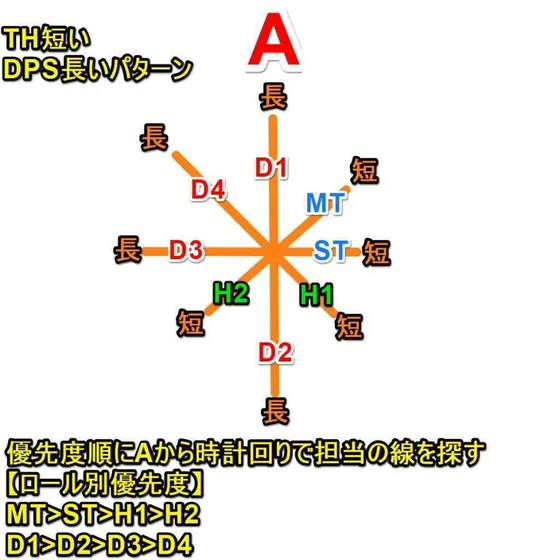
- FusefieldTetherEach player puts out one spark of their fuse length, in order.
- Bombarian SpecialRaidwideRaidwides, out, in, knockback, then spread or pairs.
- Special Bombarian SpecialEnrageEnrage after the third Doping Draught. Immunity does not help.
/p M3S - JP PF Strat (all boss-relative)
/p Spread: NW D3 · N MT · NE D4 | W H1 · E H2 | SW D1 · S OT · SE D2
/p Lariat (4-way) pairs: NW MT+D3 · NE H2+D4 · SW H1+D1 · SE OT+D2
/p Dive x8: MT left, OT right of boss; D1 D2 behind; D3 H1 H2 D4 back row
/p Dive x4 pairs: MT+D1 · OT+D2 · H1+D3 · H2+D4
/p KB towers: 1st NW melee, SE ranged | 2nd facing boss: left MT group, right OT group
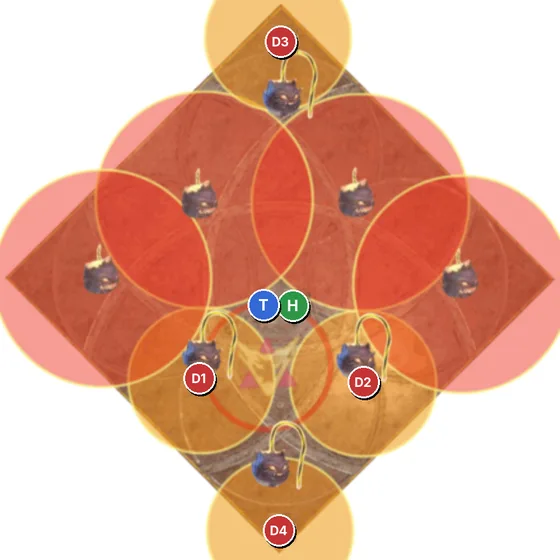
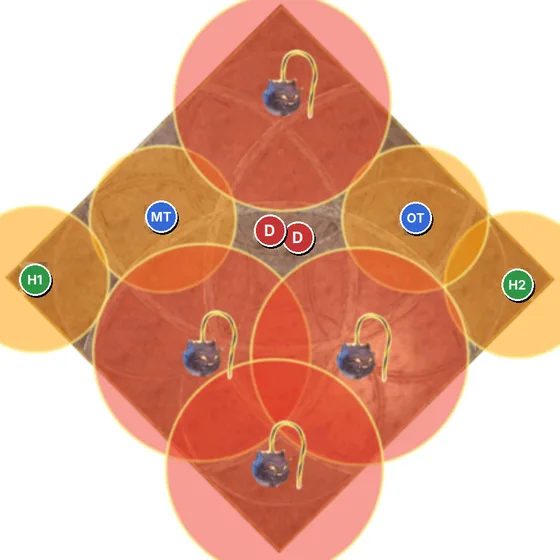
/p Fusedown: lone long bomb = north
/p Fusefield: from A clockwise, short then long: MT→OT→H1→H2, D1→D2→D3→D4
/p Special: 8 shocks = basic spread | 4 shocks = pairs in X
/p Fuse or Foe: NW D3 · N MT · NE D4 | W D1 · E D2 | SW H1 · S OT · SE H2
Paste into a macro or Party Finder description. Confirm with your party before the pull.
Fight order
Mechanics
01Lariat & Dive: read the armsCast name = spread or pairs. Fire on the arms = in, or knockback.
Octuple means eight spreads, Quadruple means four pairs. Without fire, Lariat wants you outside the center circle; with fire, inside the donut. Dives jump first: without fire move away from the landing edge, with fire prepare for the knockback.
Brutal Impact and Knuckle Sandwich
Brutal Impact is a multi-hit raidwide; Knuckle Sandwich is a multi-hit shared tankbuster. After Doping Draught both hit more times: cover the full sequence.
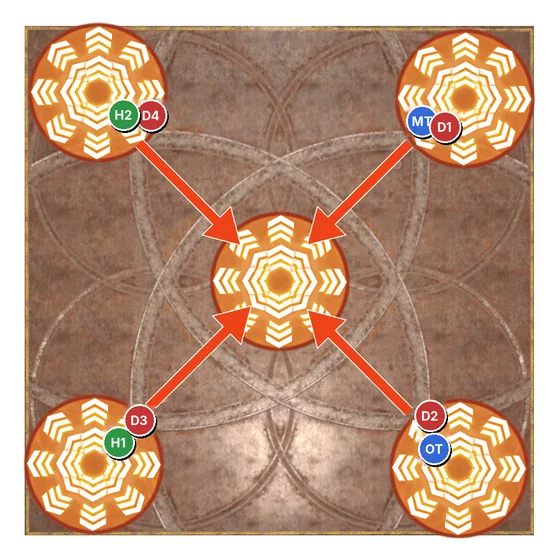
02Barbarous BarrageRide the tower knockbacks: 4 players, then pairs, then all 8.
Two towers need four players each. They knock you into four 2-player towers, then into the 8-player center tower. Your tower sets your next launch, so face the right way before it resolves.
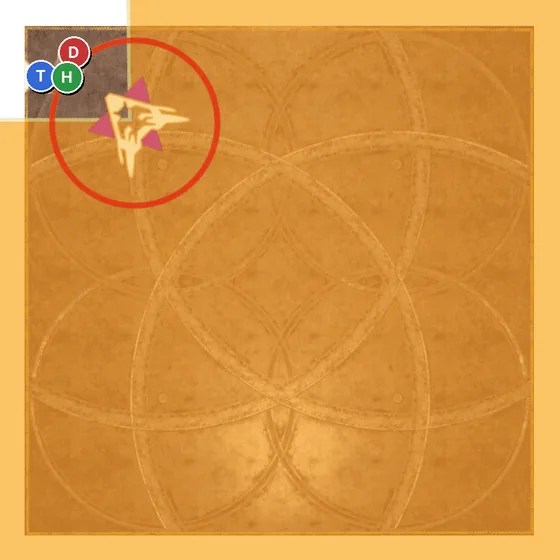
03Chain Deathmatch 1Take the hit from your chained clone only, then dodge the return.
Tag Team makes two clones. Your chain shows which clone must hit you. Taking no hit fails the debuff; taking the other clone's hit too is unsafe.
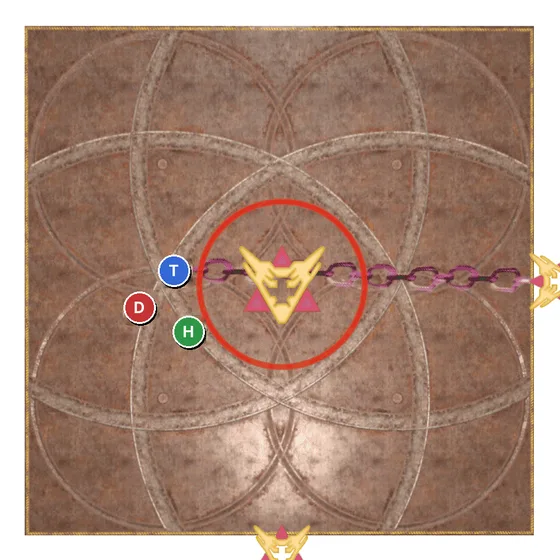
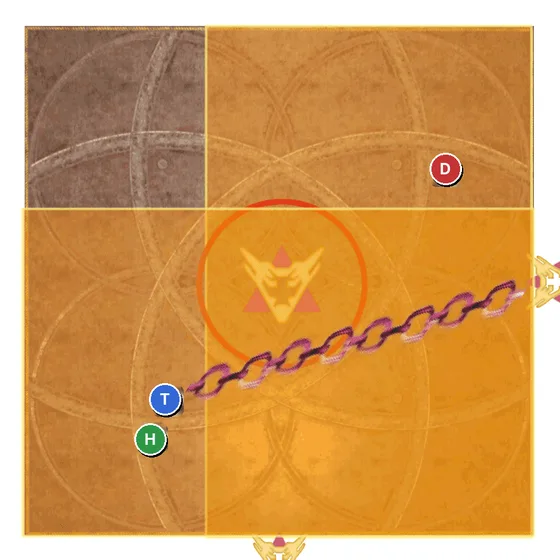
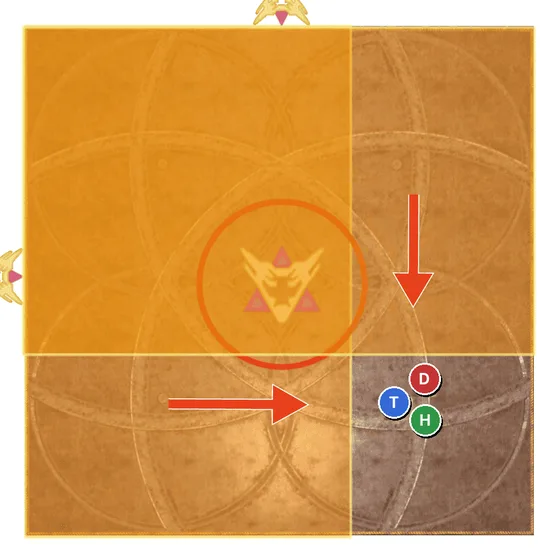
The area hit by both first cleaves is safe from both returns. Then read the boss's Lariat and heal for Brutal Impact.
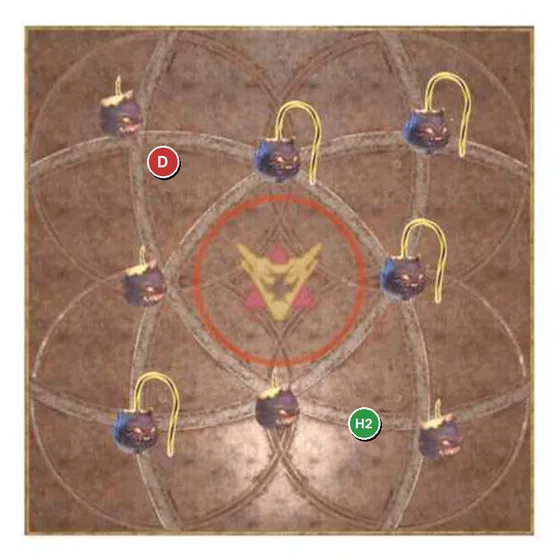
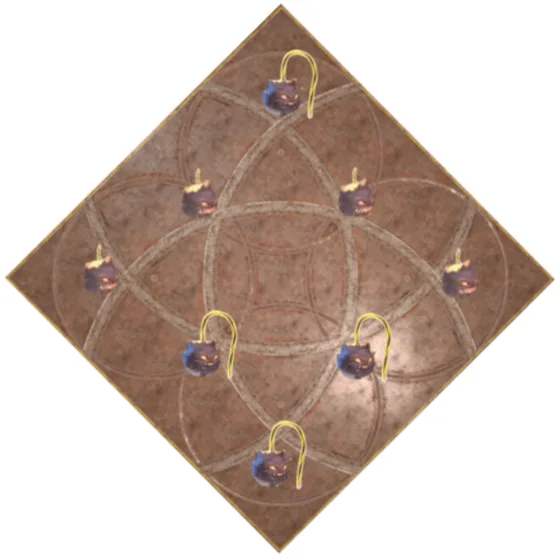
04Final FusedownShort bombs explode first, long ones after. Keep explosions apart.
Arena bombs and players get short or long fuses; all supports share one length, all DPS the other. In the JP PF Strat the lone long-fuse bomb is your reference north for the formation.
05FusefieldOne spark each, in order: short fuses, then long.
Match your Bombarium length to the short or long sparks. Each player puts out one moving spark; a spark that reaches the center wipes the party. Scan from north clockwise for sparks of your length and take the one in your slot.
Each contact deals party damage and magic vulnerability: wait for it to clear and for heals before the next contact.
06Bombarian SpecialOut, in, knockback, then spread or pairs.
After the second Doping Draught, Octoboom or Quadroboom Bombarian Special chains raidwides, out/in movement, a knockback and a delayed spread or pair finish. Mitigate the opening hits.
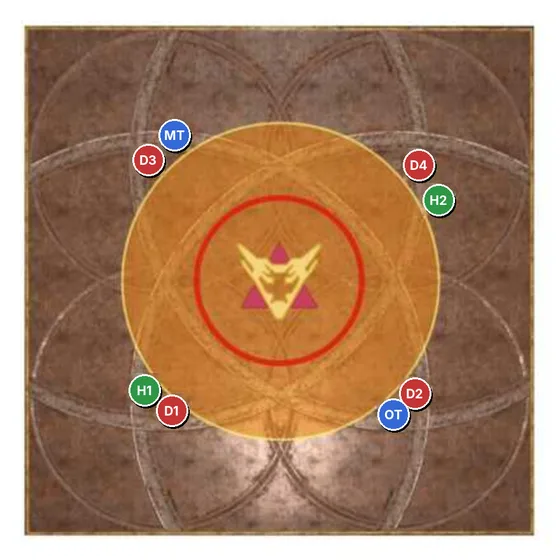
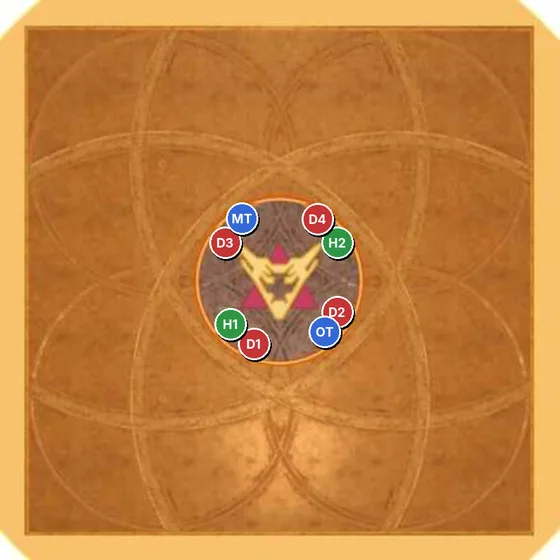
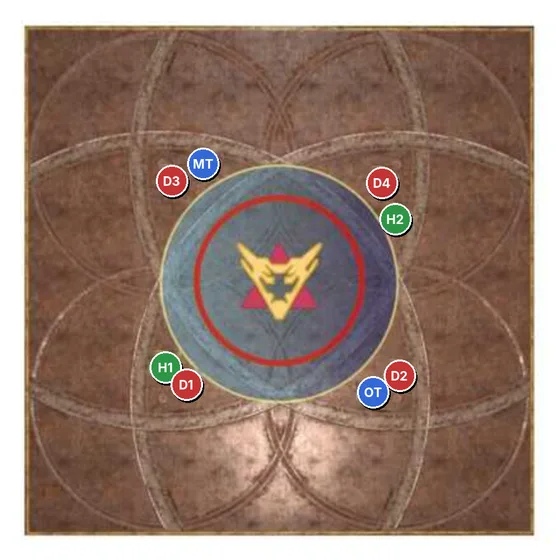
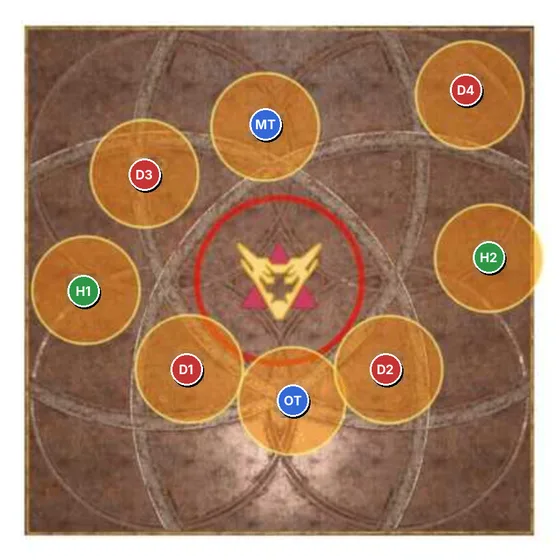
07Chain Deathmatch 2Dodge the bomb field, then take your clone hit AND the boss mist.
Fuses of Fury brings back the arena bombs (no personal bombs this time). Then Tag Team adds clone chains plus a chain to the boss.
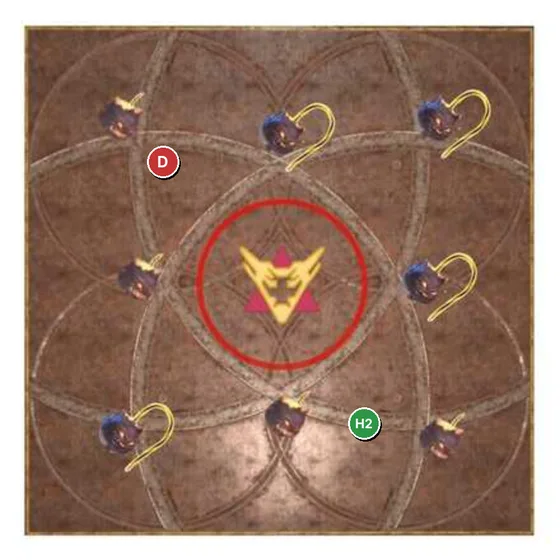
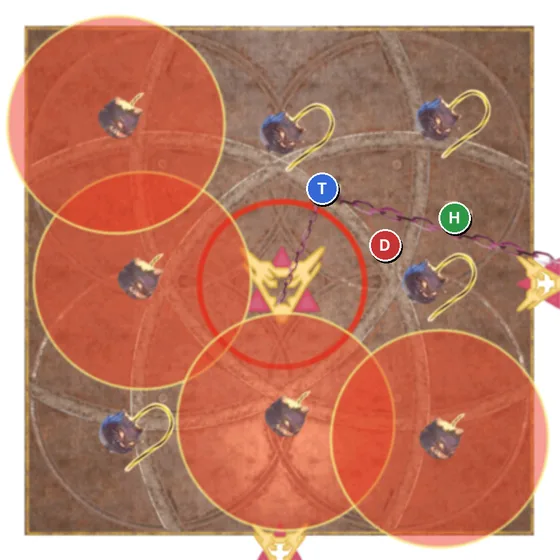
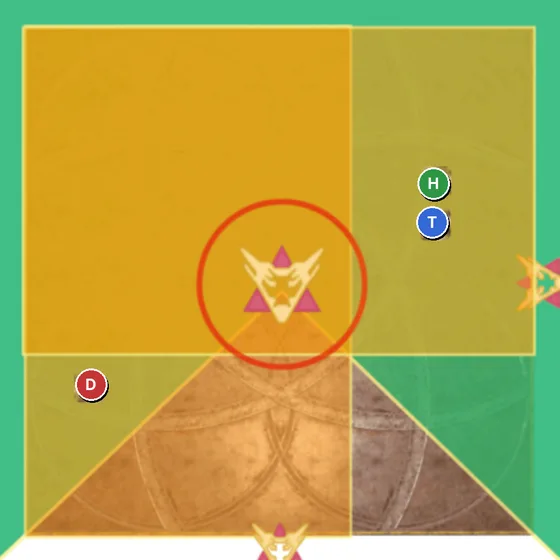
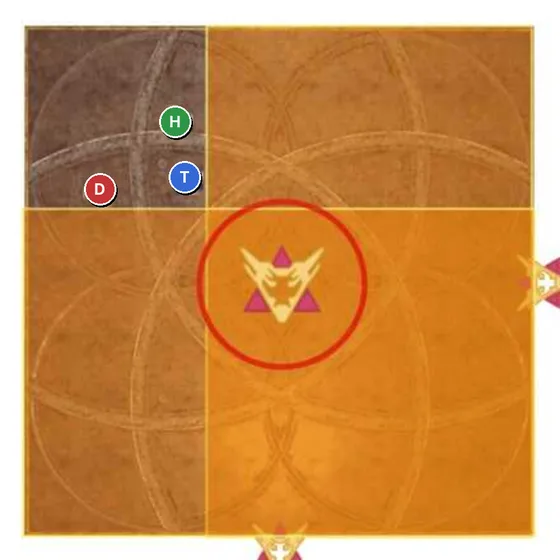
08Fuse or FoePersonal bombs again, during Infernal Spin. Use the uptime spots.
Short and long personal fuses return with Infernal Spin and growing floor AoEs. Start behind the rotating attack, move with the spin, use the cleared center after the donut, then go to your marker when the spin ends.
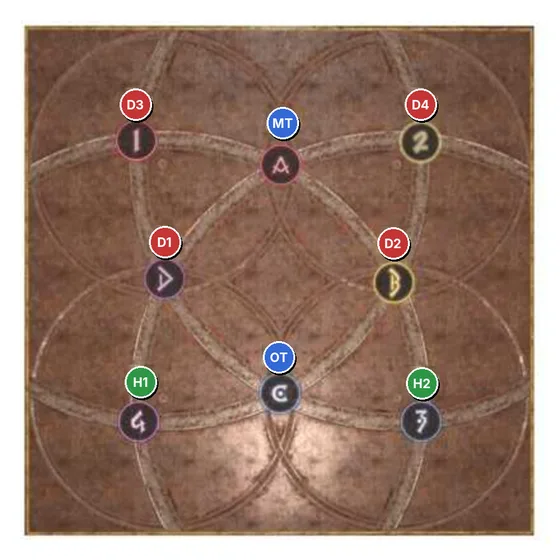
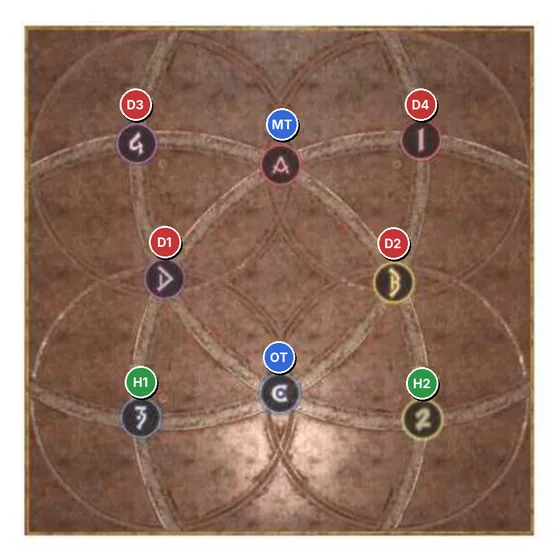
09Barbarous Barrage 2 & enrageSame tower ride, ending in Lariat Combo. Then kill before the last Special.
Ride the same tower sequence; the finisher is Lariat Combo, so read both cleaves and move between the safe halves. The last Knuckle Sandwich is a good invuln target.
The third Doping Draught leads to Special Bombarian Special. The boss becomes untargetable before the final launch; immunity does not save you.
JP vs NA vs EU
| Mechanic | JP (this guide) | NA (Hector/NAUR) | EU (Hector-based) |
|---|---|---|---|
| Lariat pairs | Supports join their assigned diagonal DPS. | Supports counter-clockwise to colour partners; true north. | Check the macro. |
| Barbarous Barrage | Ride the towers; tanks/melee N/W, healers/ranged S/E. | "No KBI": same ride; G1 left, G2 right facing center. | Same idea; confirm tower groups. |
| Final Fusedown | Relative north = the lone long-fuse bomb. | True north with fixed healer/ranged spots. | Hector, Rinon or pastebin: confirm the diagram. |
| Fusefield | North clockwise: MT, OT, H1, H2 / D1-D4. | MMRR, north clockwise (same order). | MMRR, RMMR or clock: confirm. |
| Fuse or Foe | Uptime: melee and healers swap clock spots. | Same uptime idea. | Confirm labels. |
| Tankbusters | Shared hits or a planned invuln. | Late invulns common; agree who. | Agree who. |
These are common strat families, not a census. Individual parties can differ.
Loot and rewards
 Dark Horse Champion's Chest Gear Coffer (IL 730)Coffer
 Dark Horse Champion's Leg Gear Coffer (IL 730)Coffer
 Surgelight SolventCoffer
 Surgelight TwineCoffer
 AAC Illustrated: LHW Edition IIIx1 · guaranteed · exchange for gear
 Allagan Tomestone of Mnemonicsx15
Sources
Feature details are checked against official documentation. Checklists and practice suggestions are written by Vtomes.
- Square Enix (Lodestone) — Patch 7.05 notes
- Console Games Wiki — AAC Light-heavyweight M3 (Savage)
- Game8 — Arcadion Savage guides (JP strat and diagrams)
- Square Enix — FINAL FANTASY XIV item icons
Image sources: Vtomes · FINAL FANTASY XIV © 2010 - 2026 SQUARE ENIX CO., LTD. All Rights Reserved.