


M4S Guide: Wicked Thunder
Part 4 of 4 · AAC Light-heavyweight (Savage)
- Difficulty
- Savage
- Level
- 100
- Item level
- 710 – 735
- Party
- 8 (2T · 2H · 4D)
- Patch added
- 7.05
Wicked Thunder is the tier's final fight: two phases, no checkpoint, about 13½ minutes. Count your own hits in Electrope Edge, keep the stored Aetherial Conversion in your head until Tail Thrust resolves, and pick one complete strat per mechanic.
Before you pull
Strat overview, assignments, macro
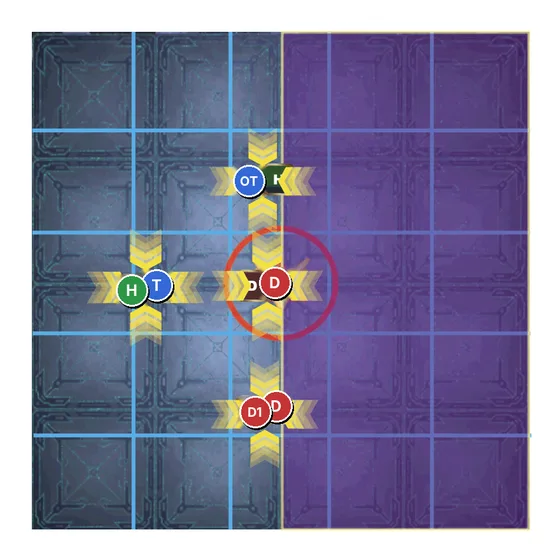
JP PF Strat: Modified clocks for the Witch Hunts, boss-relative Electrope Edge layouts with short/long counting, supports outer and DPS inner for Electron Stream, and normal wall baits for Sunrise Sabbath.
NA Party Finder usually lists Shabin/Hector for phase 1, plus either normal or AutoCAD Sunrise for phase 2. EU groups use several guide families. One strat name does not settle every mechanic. The PF description always wins: read it before joining.
Before joining a PF, confirm
- Normal vs modified clocks; Electrope Edge 1 and 2 diagrams
- Electron Stream: arena outer/inner or boss-facing left/right
- Transition pairs and tank invuln owners
- Tank LB3 cue for Cross Tail Switch
- Mustard Bomb handoff order; Midnight pair rotation
- Sunrise: normal or AutoCAD, and the matching waymarks
Unlock: Talk to Gabbro in Solution Nine after completing "The Neoteric Witch".
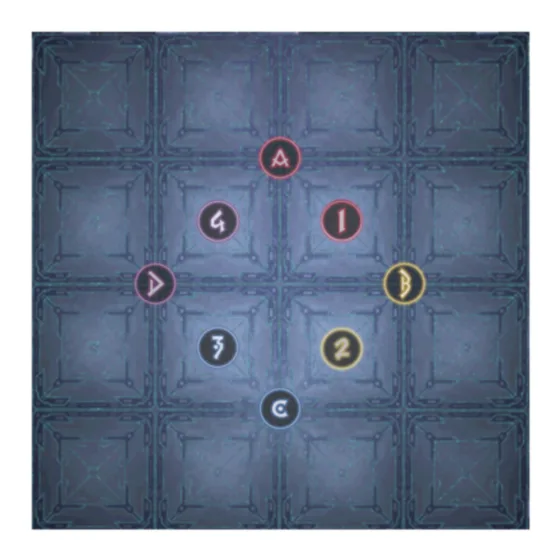
- Light parties: G1 MT H1 D1 D3 west; G2 OT H2 D2 D4 east
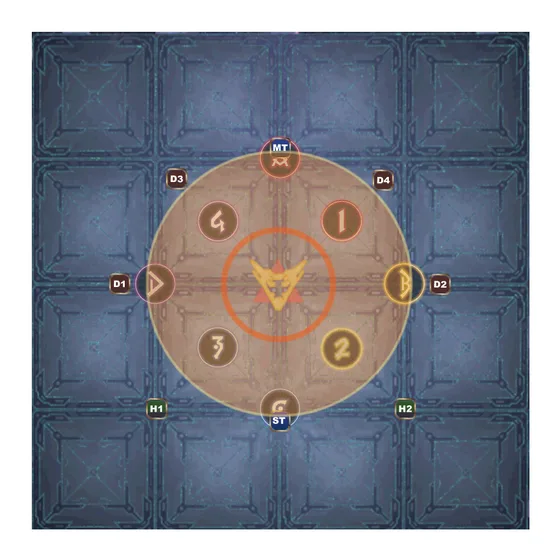
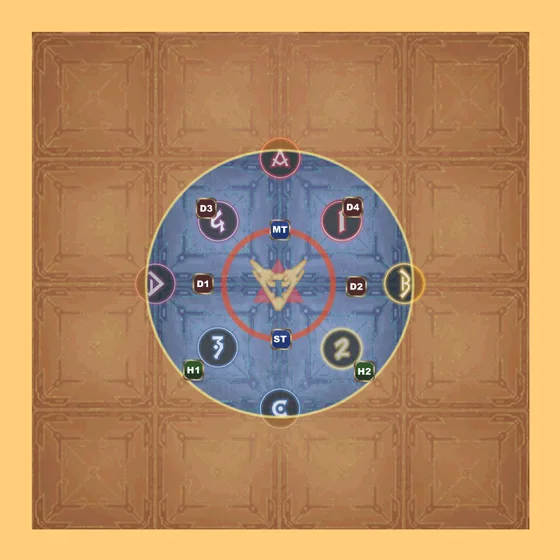
- Clocks: N MT, NE D4, E H2, SE D2, S OT, SW D1, W H1, NW D3
- Witch Hunt clocks: D1 west, D2 east, H1 southwest, H2 southeast; others unchanged
- Line-up north to south: ranged DPS, tanks, melee DPS, healers
- Pairs: MT+D3, OT+D4, H1+D1, H2+D2 (transition is boss-relative)
- Wrath of ZeusRaidwideHeavy raidwide. Mitigate.
- Wicked JoltTankbusterTwo-hit tankbuster; swap or invuln.
- Wicked BoltStackFive-hit party stack. Stack and mitigate.
- Witch Hunt (Narrowing / Widening)SpreadNear/far baits in four waves; each player takes exactly one.
- Electrope EdgeFloorCount Witchgleam hits on cubes, then on yourself.
- Ion Cluster / Electron StreamTetherTake the opposite-colour stream to drop a stack, three times.
- Electrope TransplantConesTwo sets of seven cone waves; dodge between lanes.
- Cross Tail SwitchRaidwideNine heavy hits. Tank LB3 and party mitigation.
- Mustard BombTankbusterTank tethers, then hand bombs only to clean players.
- Aetherial Conversion / Tail ThrustKnockbackStores red (impacts) or blue (knockbacks) and a side; replays later.
- Sunrise SabbathTetherBait an opposite-colour cannon, others take towers; then swap.
- Sword QuiverStackLine cuts with raidwide damage; four pair stacks in safe pockets.
/p M4S - JP PF Strat (all boss-relative, normal Sunrise)
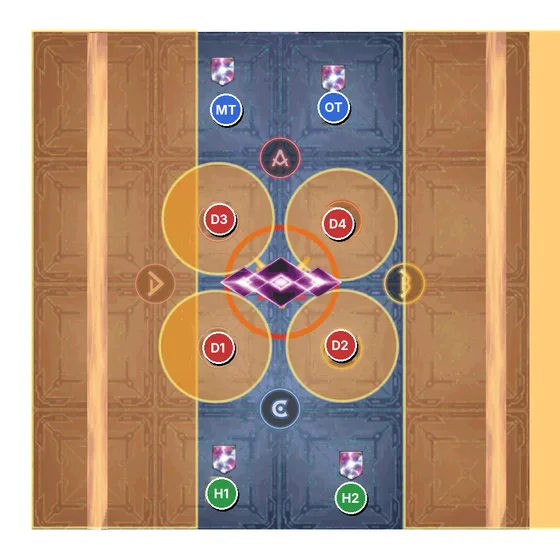
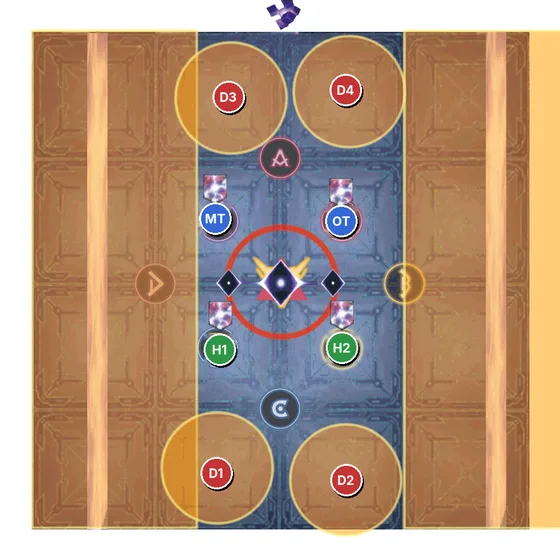
/p Spread: NW D3 · N MT · NE D4 | W H1 · E H2 | SW D1 · S OT · SE D2
/p Witch Hunt: NW D3 · N MT · NE D4 | W D1 · E D2 | SW H1 · S OT · SE H2
/p Electrope Edge 2: supports W, DPS E | pairs: more hits supports B/D, DPS center; fewer supports A, DPS C
/p Electron Stream: supports outside, DPS inside
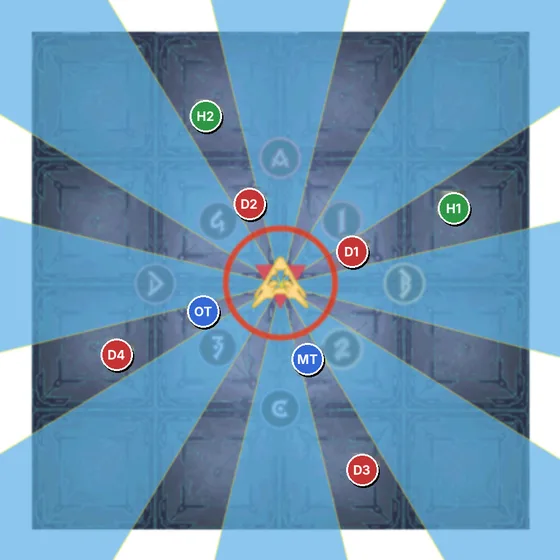
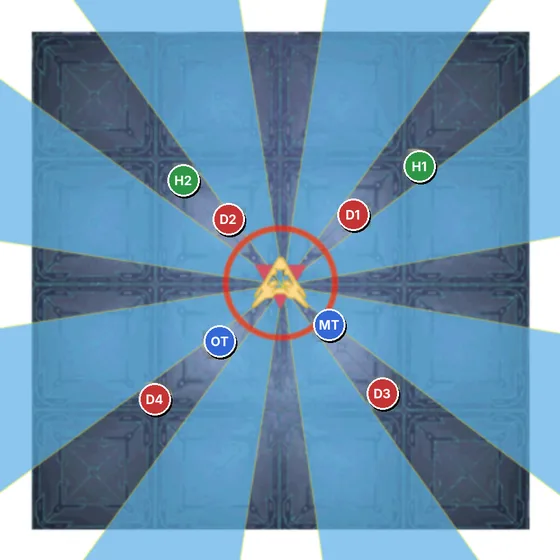
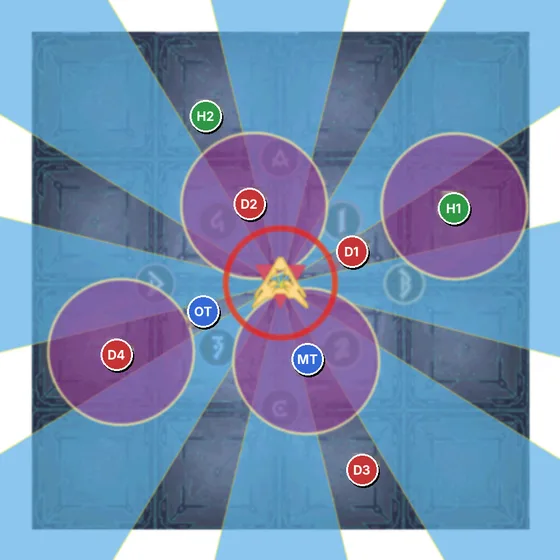
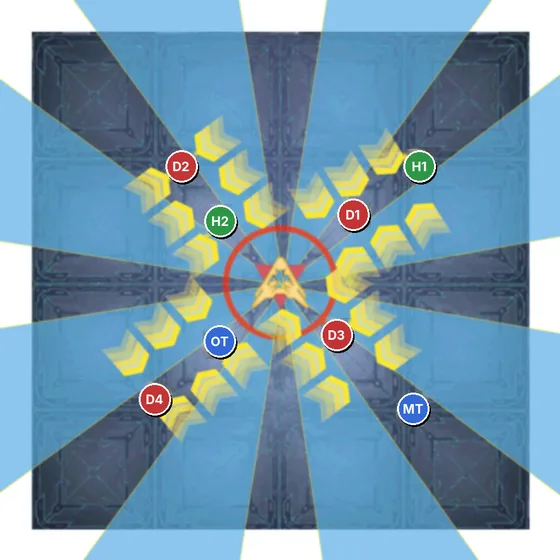
/p Electrope Transplant: NW D3+MT · NE OT+D4 · SW H1+D1 · SE D2+H2; clockwise, then back
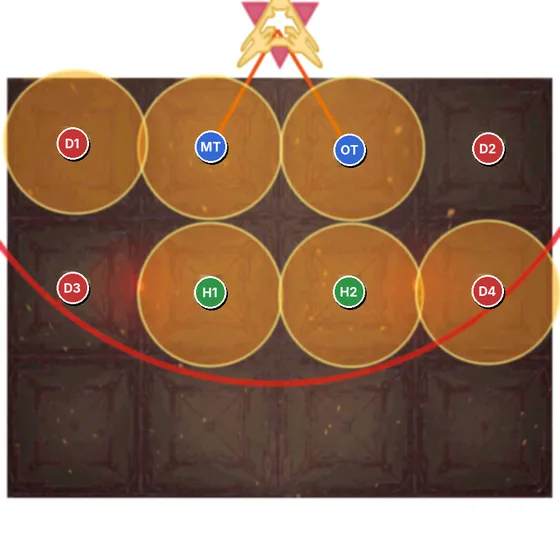
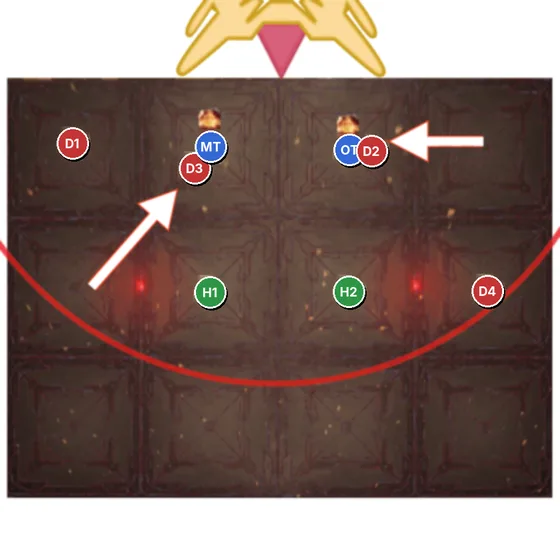
/p P2 groups: west MT D1 D3 H1 | east OT H2 D4 D2 (Mustard Bomb in that order)
/p Raining Swords: left MT D1 H1 D3 · right OT D2 H2 D4 (front to back)
/p Sunrise towers: supports S/W, DPS N/E
/p Sunrise baits: supports from 11 o'clock counter-clockwise, DPS from 12 clockwise
Paste into a macro or Party Finder description. Confirm with your party before the pull.
Fight order
Mechanics
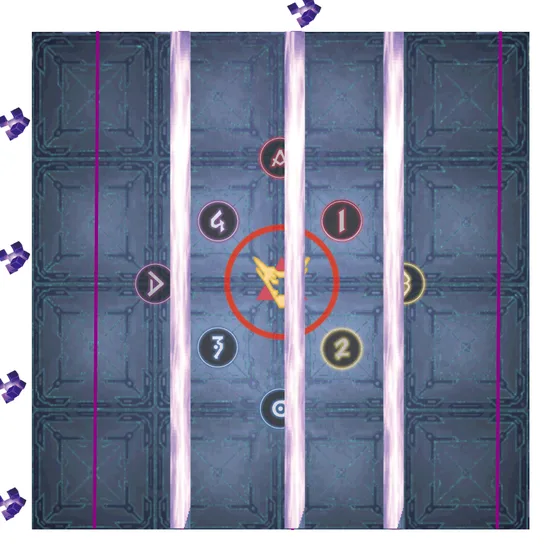
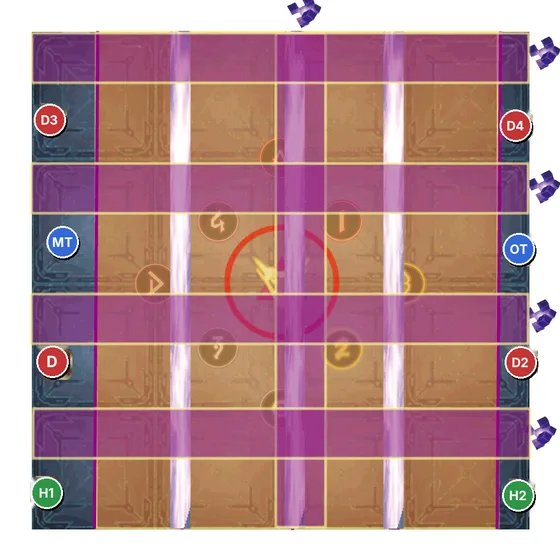
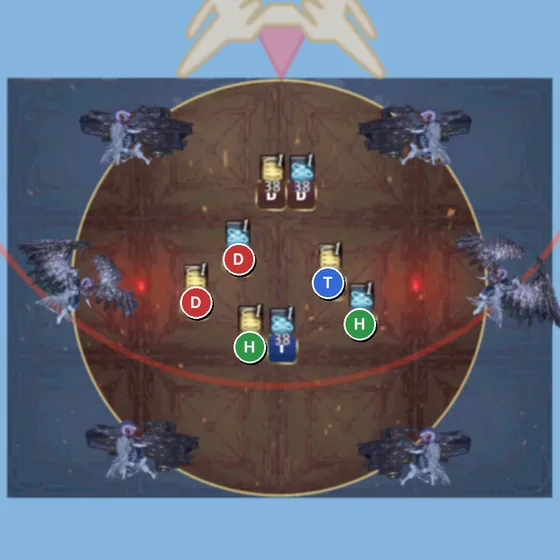
01Bewitching Flight & first Witch HuntsStand where both laser sets miss, then bait near or far.
Find where the gaps in the boss's vertical wing lasers meet the gaps in the west-side battery lines. After Flight, watch which floor lines light up first and check the next batteries on the other wall.
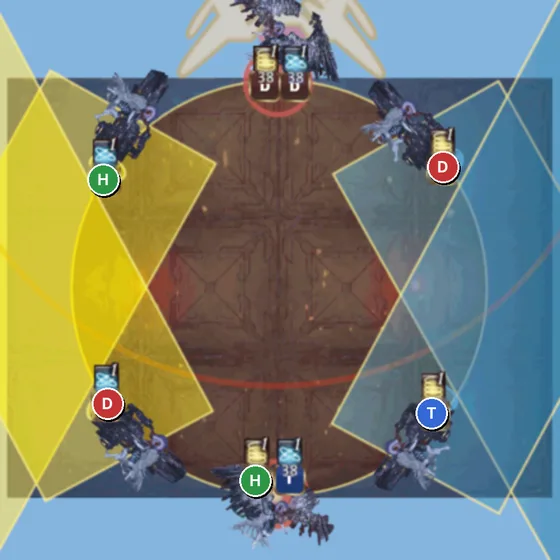
02Narrowing / Widening Witch HuntFour bait waves, two players each, in/out pattern.
Narrowing goes in, out, in, out; Widening goes out, in, out, in. Each wave targets two players and every player takes exactly one bait. Use the modified clocks.
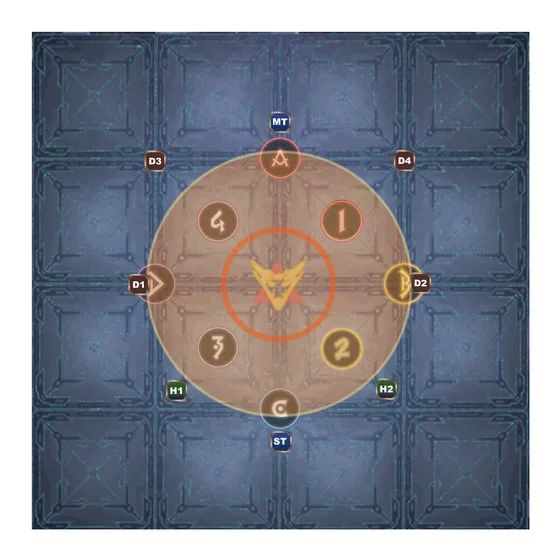
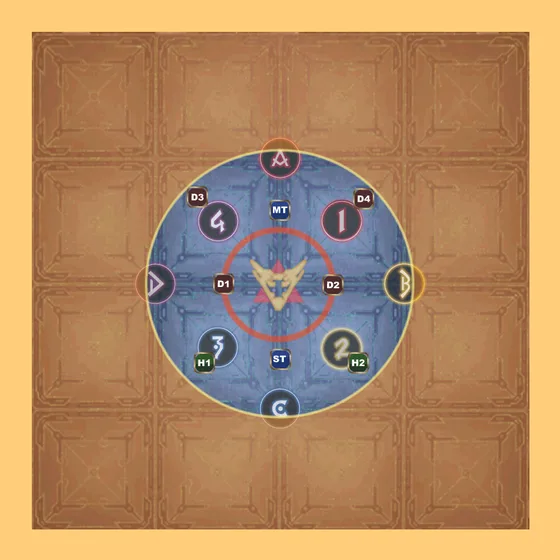
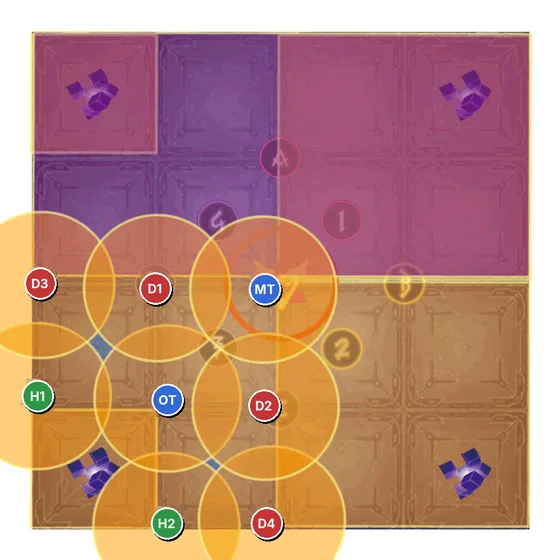
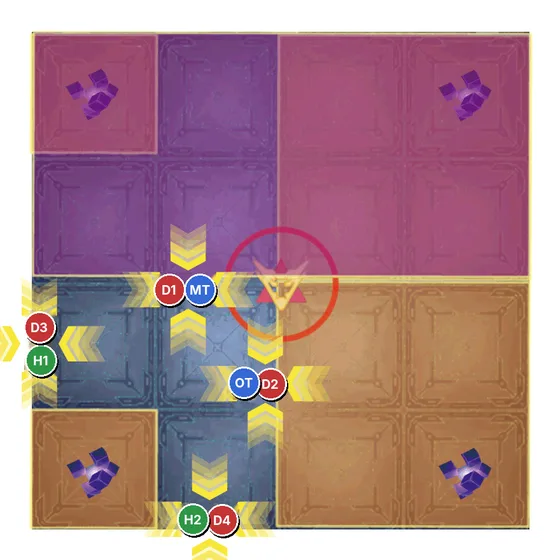
03Electrope Edge 1Count hits on the corner cubes, then stand in the L-shaped safe area.
Four cubes spawn in the corners. One-hit cubes only explode their own tile; two-hit cubes cover their whole quadrant. Sidewise Spark then removes one half, leaving an L-shaped safe area.
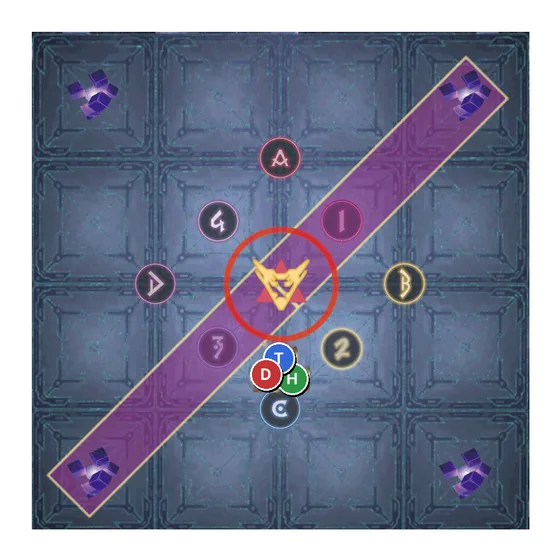
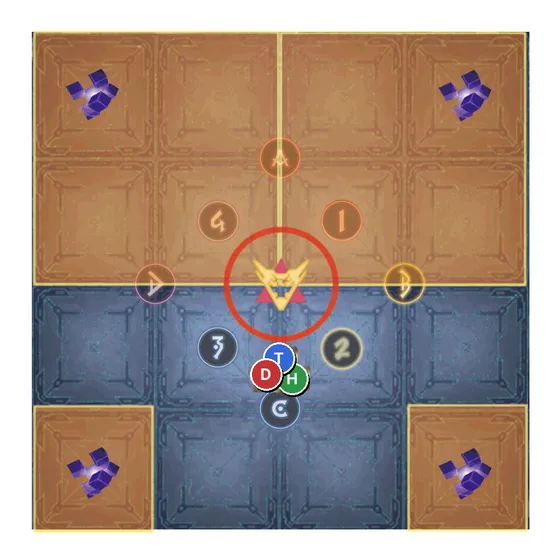
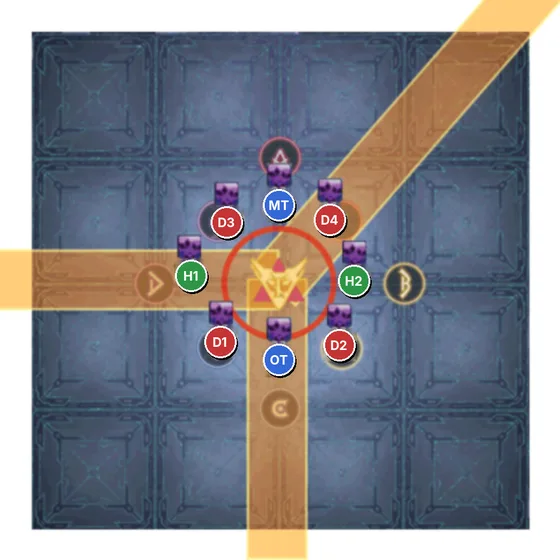
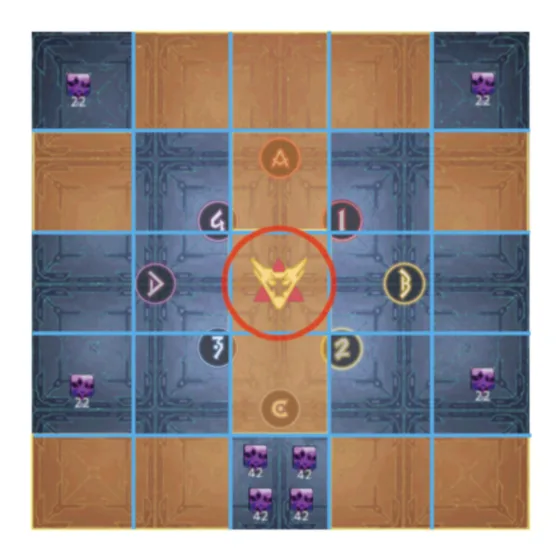
04Electrope Edge 2Count your own hits; long timers add one.
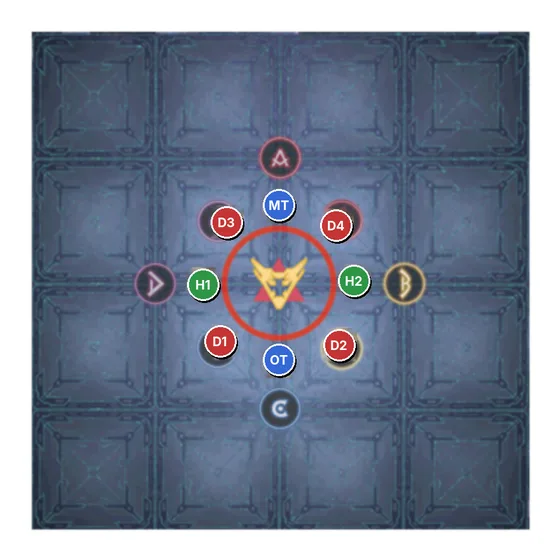
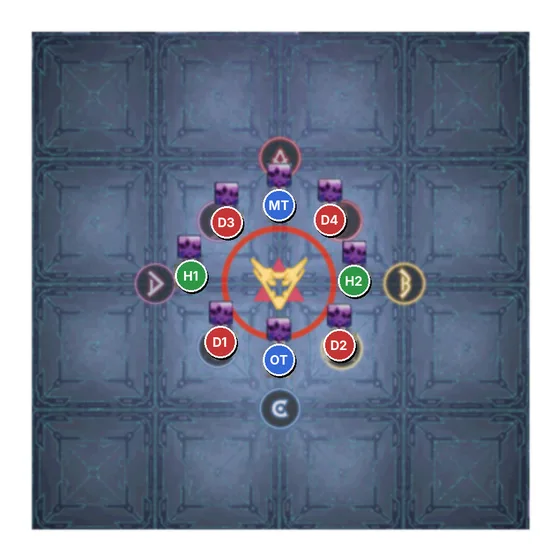
Electrical Condenser gives four short (~22 s) and four long (~42 s) timers. Short timers take two or three hits; long timers take one or two now and gain one more from the next stack/spread. Two effective hits = small discharge, three = large.
Finishing the cages
Lightning Cage can rotate. Find the one cardinal refuge for the waiting group and orient the spread from there (the JP diagrams call it local south).
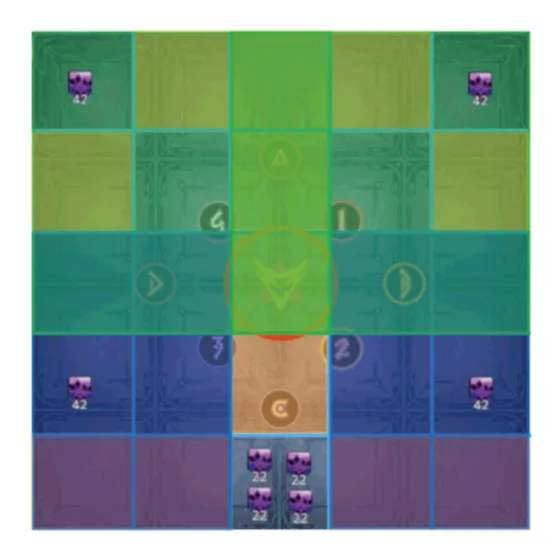
05Ion Cluster & Electron StreamTake the opposite colour three times. Tanks take the front.
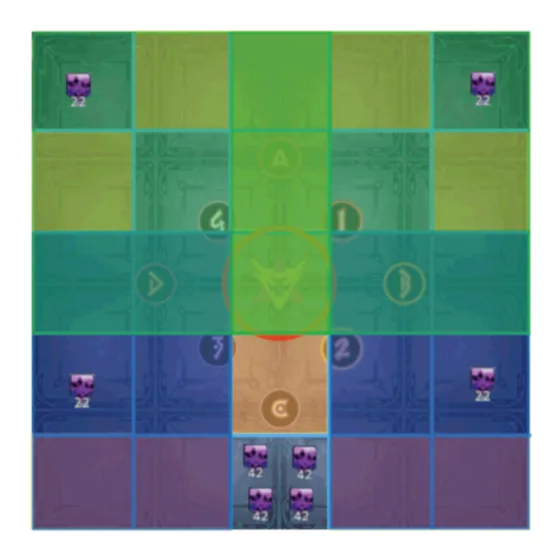
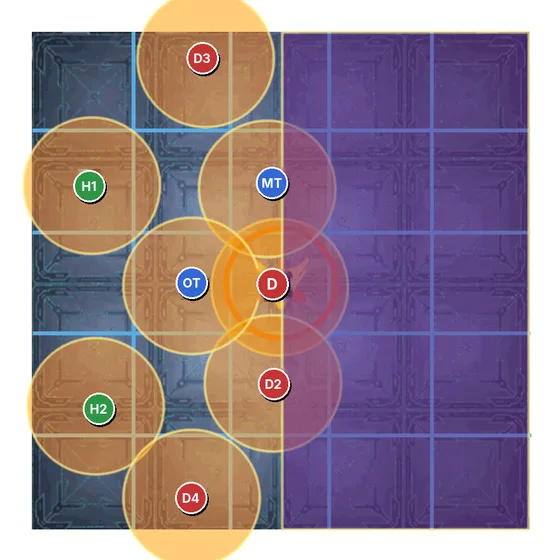
Ion Cluster gives three stacks of Positron or Negatron. Stampeding Thunder destroys three quarters of the platform: get into the surviving strip. Each Electron Stream fires two colours; take the opposite of your debuff to drop a stack.
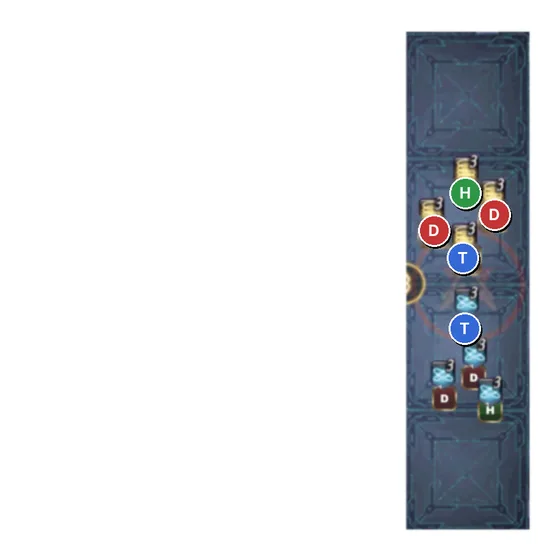
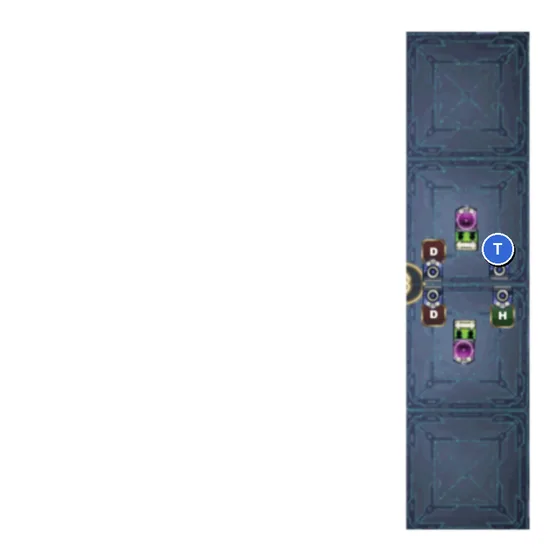
- Spinning / Roundhouse Conductor: place your circle or donut at your outer/inner spot.
- Proximate / Remote Current: aim your beam into a Collider player.
- Collider Conductor: take the incoming beam to clear it.
06Electrope TransplantBoss facing is north. Two sets of seven waves.
The boss faces south; treat that as north and set up four pair quadrants. Alternate between cone lanes and gaps, seven waves per set, twice.
07Cross Tail Switch & Wicked BlazeNine heavy hits, then healer stacks through exaflares.
Cross Tail Switch is nine heavy raidwide hits: plan tank LB3 and party mitigation. Wicked Blaze then hits both light-party stacks repeatedly while exaflares cross the platform.
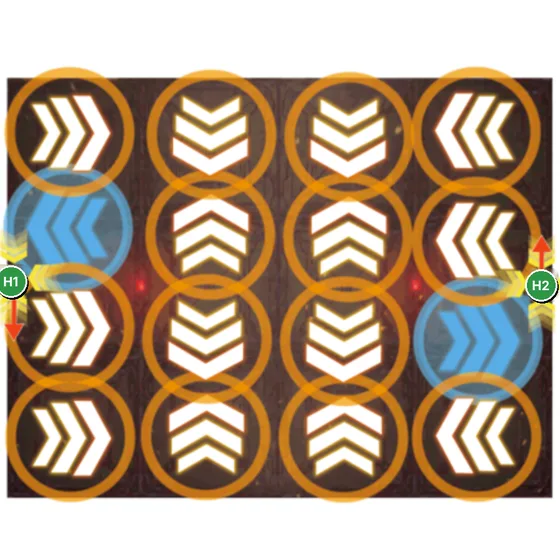
- Wicked Special, flaming sword: avoid the center; use the sides.
- Wicked Special, side cannons: avoid the sides; use the center.
08Mustard BombTanks take tethers; bombs go only to the two clean players.
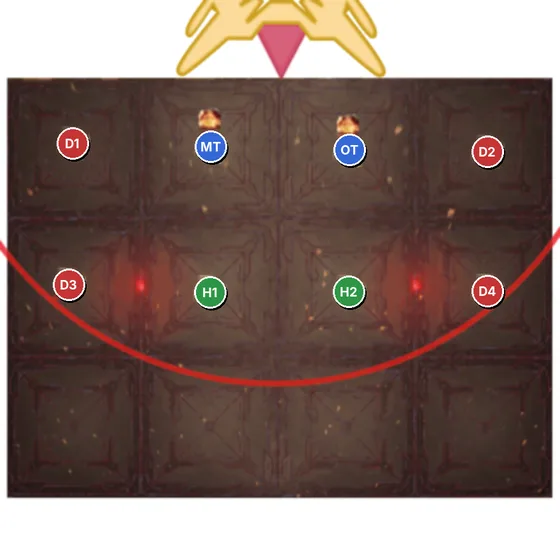
Two tethers carry the first heavy hits: one per tank, mitigated. Everyone else spreads; four get hit by extra circles, leaving two clean players for the bombs.
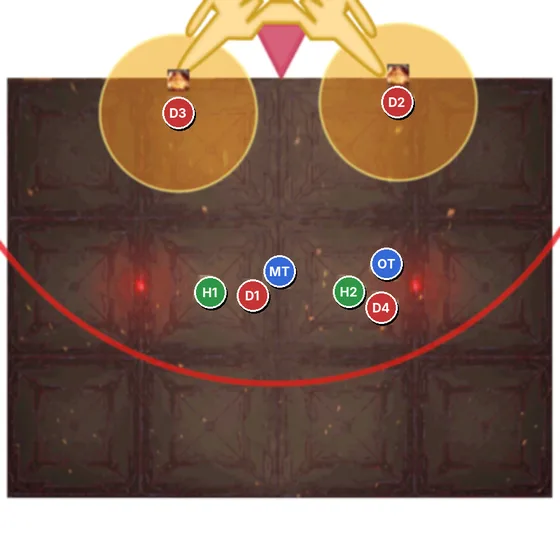
09Aetherial Conversion / Tail ThrustRemember the element and the side. It replays later.
Aetherial Conversion charges the tail with red or blue in a visible order; Tail Thrust replays it later, sometimes after another mechanic.
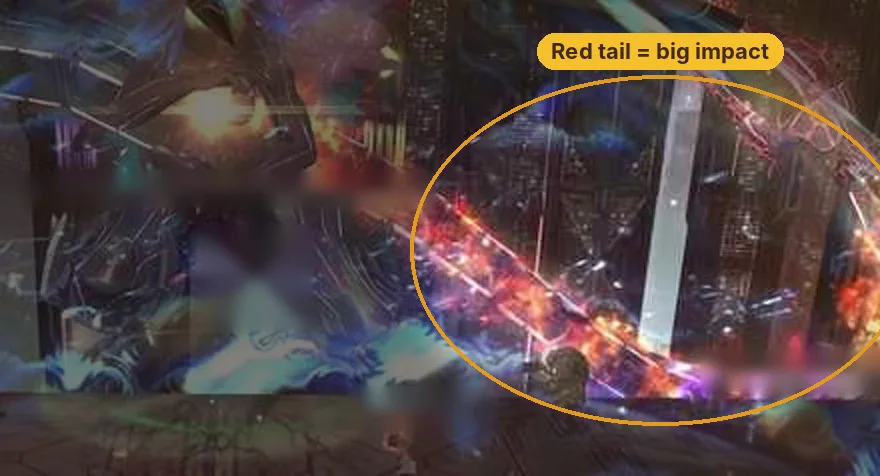
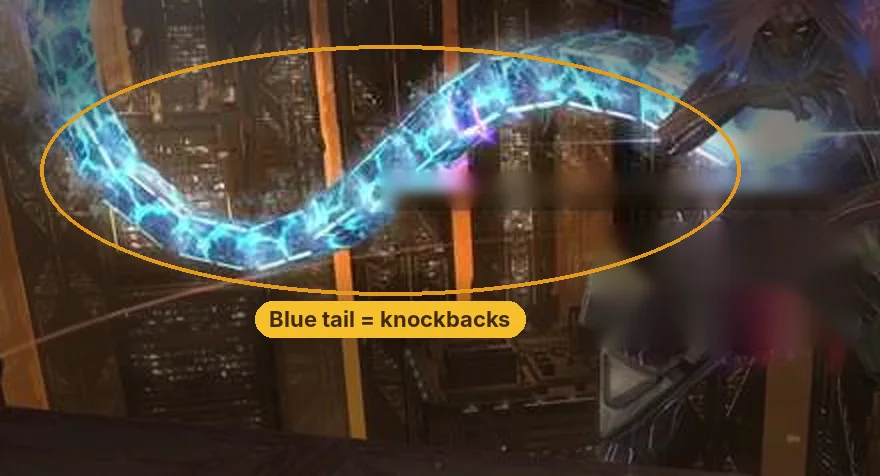
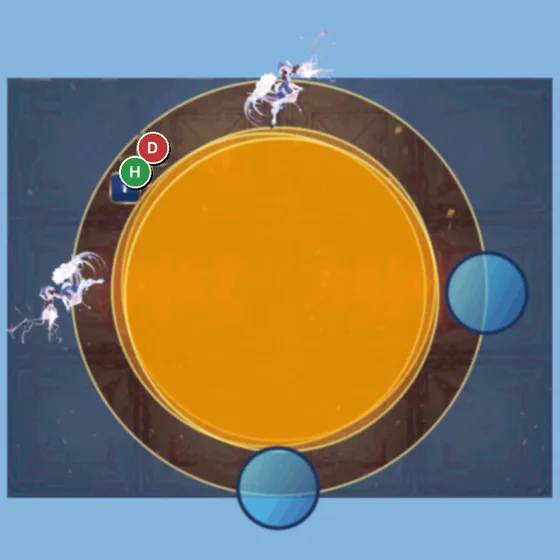
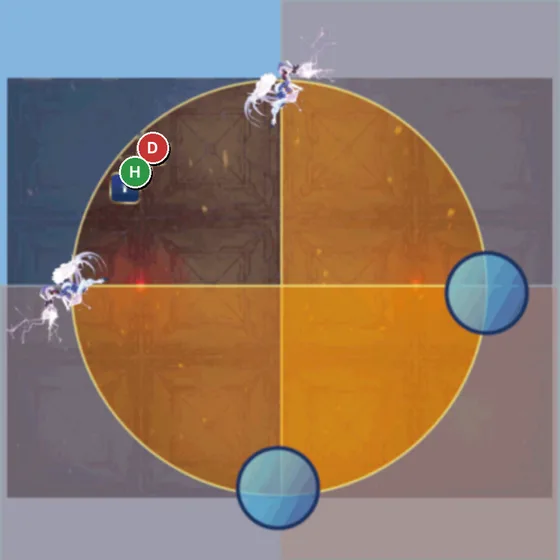
10Twilight SabbathBait center, then two safe quadrants from two clone pairs.
Azure Thunder shrinks the arena to a circle. Stack in the center to bait Wicked Fire. Four side-cleaving clones come in two pairs; the lower pair goes first.
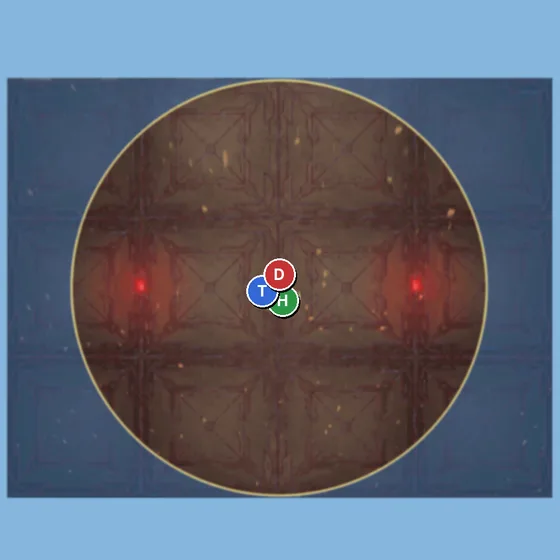
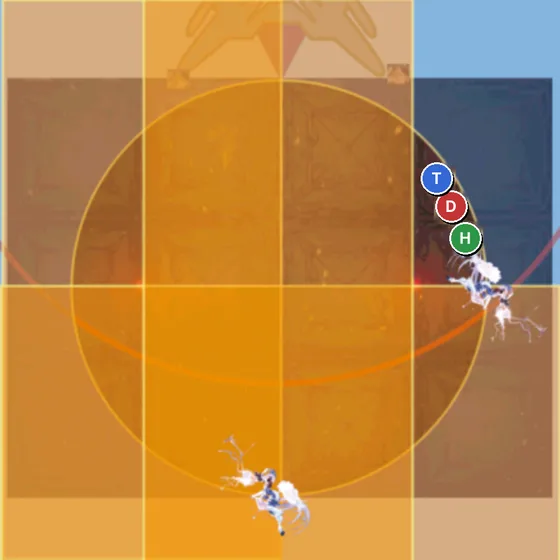
11Midnight SabbathCannons fire forward, wings make donuts; spread and pairs swap.
Cardinal and intercardinal clones come in two waves. Cannons fire straight ahead; winged clones make donuts, so stand under them. The boss adds spread then pairs, or pairs then spread.
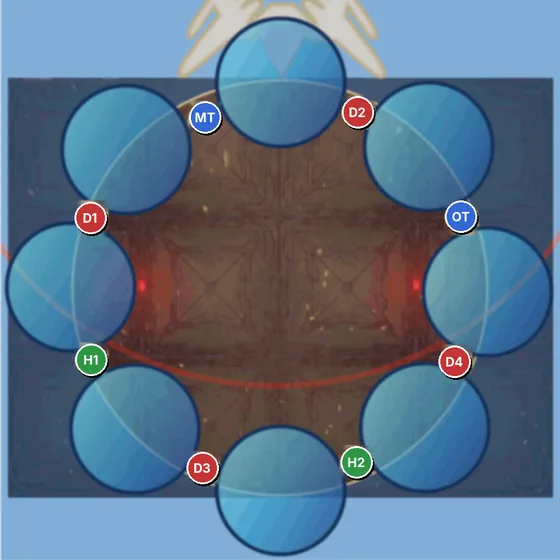
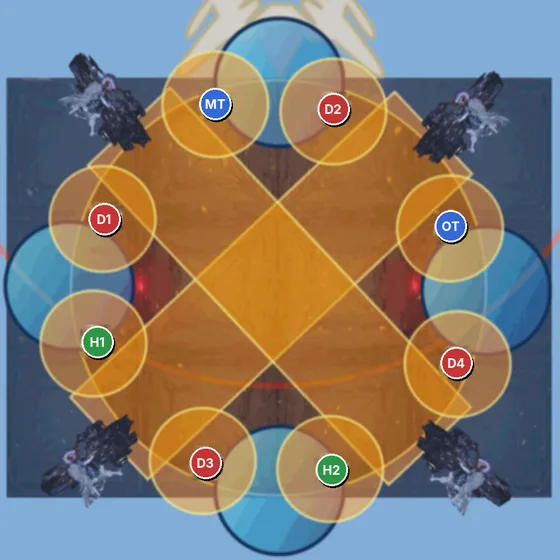
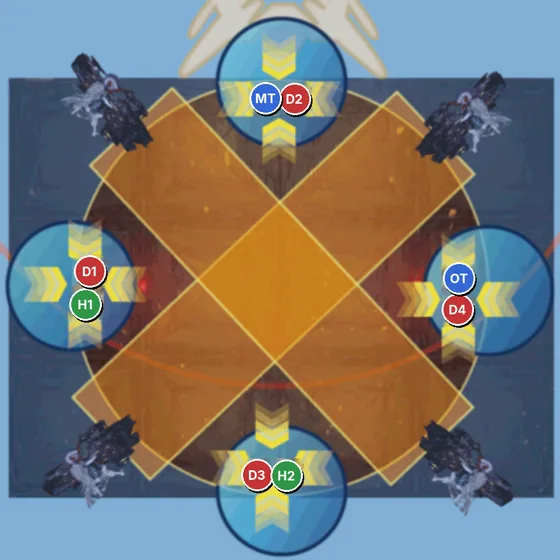
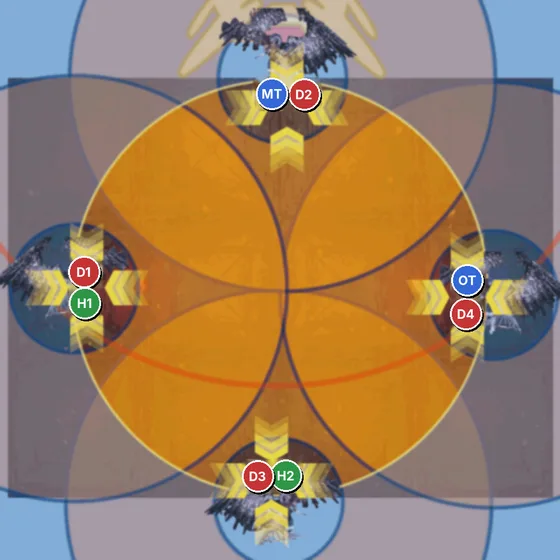
12Raining Swords & Chain LightningTake your tower, then remember your platform's safe sword order.
Remember the new Aetherial Conversion. Split west/east before Flame Slash breaks the center. Towers appear fast: take your assigned tower on your side.
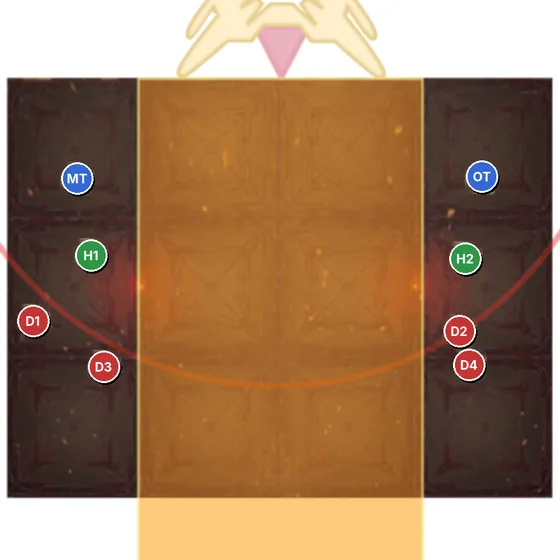
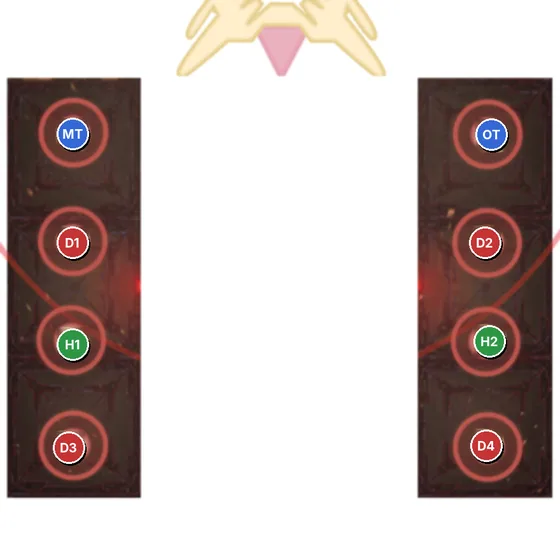
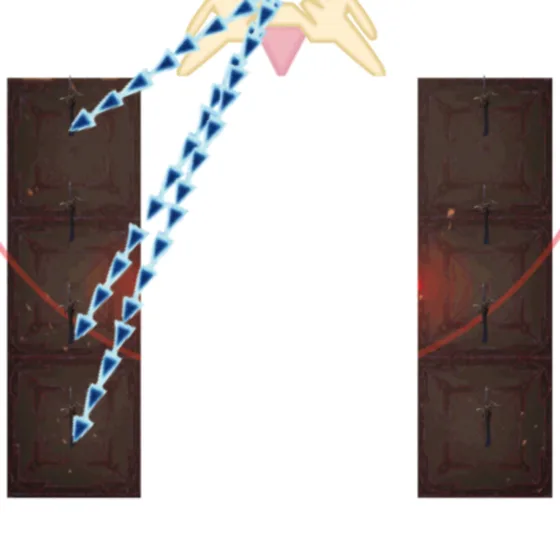
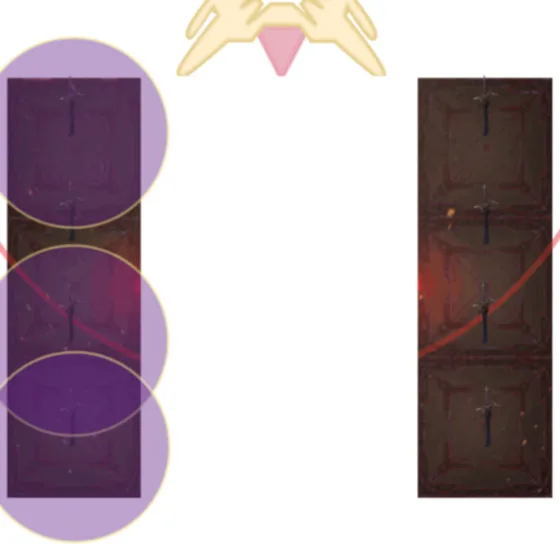
13Sunrise Sabbath (normal wall baits)Short timers bait opposite-colour cannons, long timers take towers, then swap.
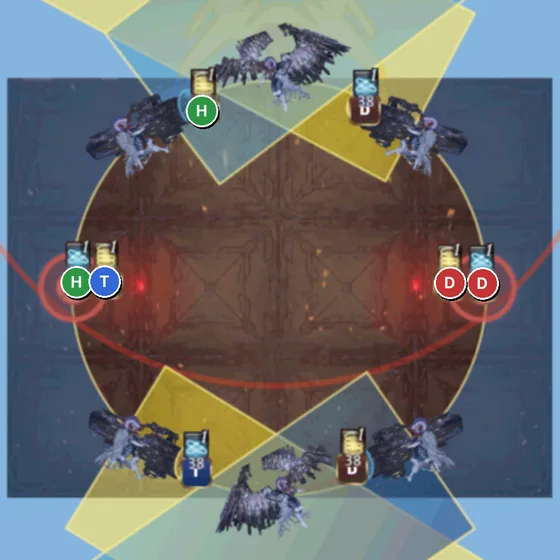
Record the new tail memory. Ion Cluster gives yellow or blue with short or long timers. Four cannon clones target their nearest player: bait one of the opposite colour to cleanse. Two winged clones show where the two-player towers will be.
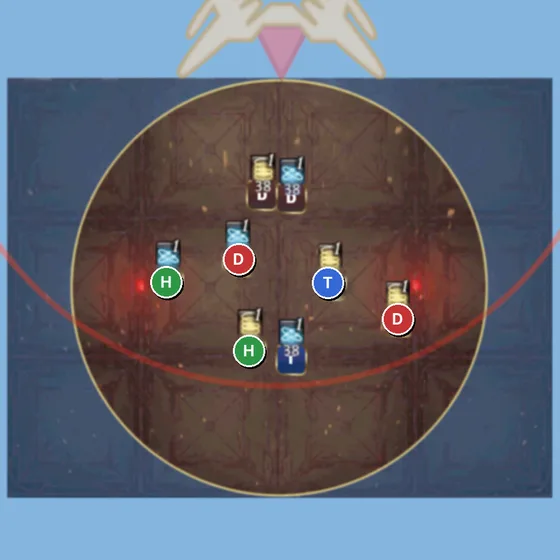
14Sword Quiver & enrageFour pair pockets, three times. Enrage after the third.
Sword Quiver draws three fixed cuts and one variable cut (top, middle or bottom). The lines explode while four pair stacks resolve, and every cut hits the party.
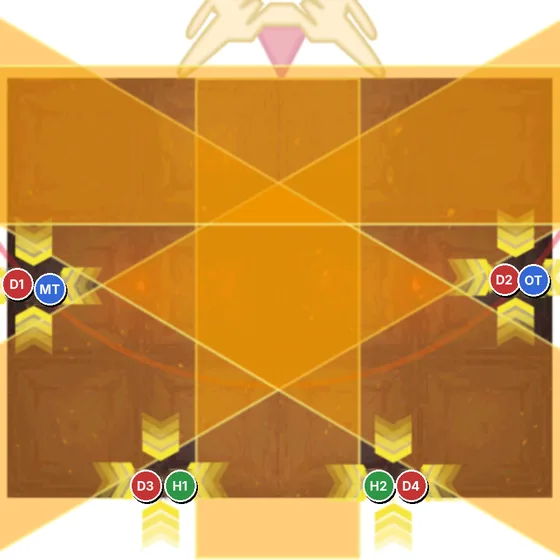
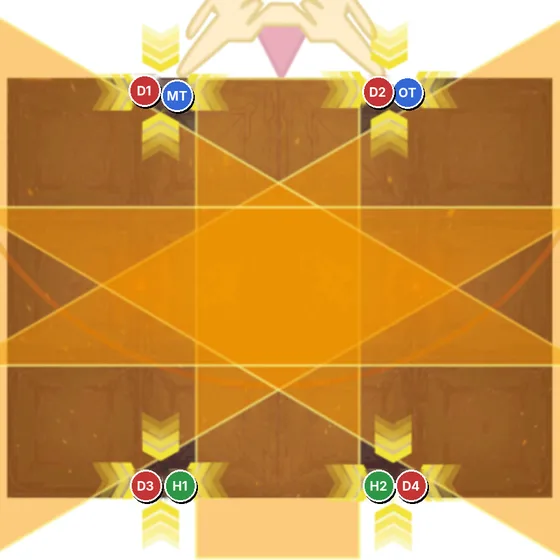
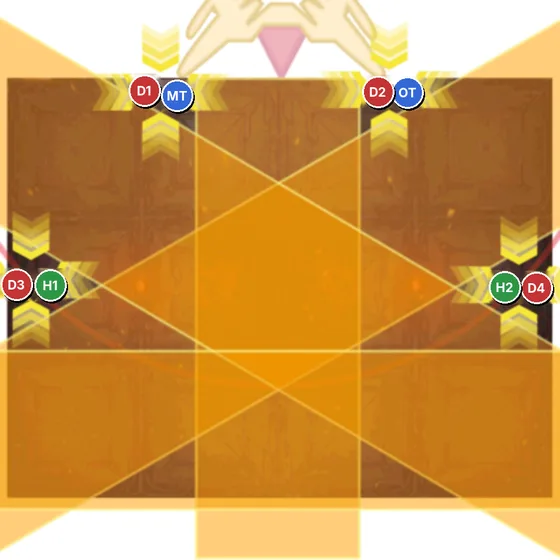
After three Sword Quivers, Wicked Thunder wipes the party: about 13½ minutes at full length.
JP vs NA vs EU
| Mechanic | JP (this guide) | NA (Shabin/Hector) | EU (mixed) |
|---|---|---|---|
| Witch Hunt | Modified clocks with near/far bait order. | Same role-bait idea; check the exact distances. | Confirm. |
| Electrope Edge 1 | Boss-relative L spots in the safe quadrant. | Same solve; L positions follow the macro. | Confirm the diagram. |
| Electrope Edge 2 | Long timers count +1; the refuge is local south. | Same counting; some diagrams call the refuge north. | Ask which way is 'north'. |
| Electron Stream | Supports to the strip's outer edge, DPS inner. | Supports left, DPS right facing the boss. | Different rule: confirm. |
| Transition | Boss-relative quadrants; south becomes north. | Same idea; agree pairs and who stands in front. | Same idea. |
| Sunrise Sabbath | Normal wall baits. | Normal or AutoCAD (exact waymark edges). | Normal, uptime or a raidplan. |
These are common strat families, not a census. Individual parties can differ.
Loot and rewards
 Dark Horse Champion's Weapon Coffer (IL 735)Coffer · or a job weapon (IL 735)
 Black KittenMinion · coffer
 A Risky Bet Orchestrion RollOrchestrion · coffer
 Monowheel S1 Identification KeyCoffer
 AAC Illustrated: LHW Edition IVx1 · guaranteed · exchange for gear
 Allagan Tomestone of Mnemonicsx15
Sources
Feature details are checked against official documentation. Checklists and practice suggestions are written by Vtomes.
- Square Enix (Lodestone) — Patch 7.05 notes
- Console Games Wiki — AAC Light-heavyweight M4 (Savage)
- Game8 — Arcadion Savage guides (JP strat and diagrams)
- Square Enix — FINAL FANTASY XIV item icons
Image sources: Vtomes · FINAL FANTASY XIV © 2010 - 2026 SQUARE ENIX CO., LTD. All Rights Reserved.