


DMU Guide: Dancing Mad (Ultimate)
- Difficulty
- Ultimate
- Level
- 100
- Item level
- 795
- Party
- 8 (2T · 2H · 4D)
- Patch added
- 7.51
Read each real or fake tell when Kefka gives it so you can resolve the right mechanic later. P2 ends in a fake clear if any P1 trap falls off, a gravity bubble goes unsoaked, or the party fails to use all 16 teleport arrows.
Before you pull
Strat, assignments, skills and one macro per phase
JP PF Strat: Use the Japanese PF role spots throughout. Burst on pull to gain about five to six seconds of burst before the P2 deadline.
NA groups advertise Kefkabin, while EU Light groups use LPDU. The PF description always wins.
Before joining a PF, confirm
- Burst on pull or delay?
- Which P2 tower priority and pairs?
- Who presses tank LB3 for Vacuum Wave?
- Which black hole handoffs and stomp orientation?
- Which gaze markers and spots?
- Where do healers stand for Orchestra?
Unlock: Clear AAC Heavyweight M4 (Savage), then speak to the Wandering Minstrel in Tuliyollal (11.1, 14.6). Enter through Raid Finder with eight level 100 players who have all cleared M4 Savage.
- P2 pairs: MT/H1, OT/H2, D1/D3, D2/D4.
- P3 Chaos: OT H2 D1 D2. Exdeath: MT H1 D3 D4.
- P4: track both gaze tells and both elemental casts separately.
- P5 Holy invuln: MT first, OT second.
- Revolting Ruin IIITankbusterAim both cones away and invuln the double hit.
- Graven ImageSpreadSplit west and east, read the riddle, then trade beams for towers.
- Double-trouble TrapKnockbackPass the trap within each role group.
- Light of Judgment and HyperdriveRaidwideMitigate the party hit and cover three tank hits.
- Graven Image IIFloorRead your tether twice and use the trap knockback to soak gravity.
- Tele-trouncingSpreadMatch your arrows, place both panels and take your assigned spread or stack.
- Phase transitionEnragePush Kefka to 14.9% or lower.
- Ultimate EmbraceTankbusterShare the buster with both tanks.
- ForsakenStackFind the stack pairs, then rotate with each new tower set.
- Light of JudgmentRaidwideClear every tower charge before the raidwide.
- Trine and Wings of DestructionCleaveEnter the first triangle and give the tanks nearest and farthest.
- Ultimate Embrace and enrageEnrageShare the last buster and finish before the 6:20 deadline.
- The Decisive Battle ITetherJoin your assigned boss before the proximity buffs go out.
- Bowels of AgonyKnockbackRead the crystals, cleanse wind and tank LB3 the group knockback.
- Ultima BlasterCleaveNumber from the first landing in the direction opposite dash two.
- The Decisive Battle IITetherJoin your assigned boss before the proximity buffs go out.
- EarthquakeRaidwideTop the marked healer first, then the marked DPS after vulnerability expires.
- Black HoleTetherCount clockwise from giant Kefka and hand off the designated tethers.
- Stomp-a-MoleStackBait ice in the middle, spread to quadrants and trade stacks for towers.
- Kefka Says and Grand Cross IRaidwideRecord the first truth tell and shield Grand Cross.
- Grand Cross IIRaidwideRecord the second Cross and elemental tell separately.
- Grand Cross III and Flood of NaughtCleaveChoose the flood half from your wound, survival status and flood tell.
- Short debuffs and Cursed ShriekSpreadSpread from Neo Exdeath’s beam, then resolve the early gaze.
- Ultima Upsurge and elemental expiryRaidwideReturn to centre and wait for the correct elemental cue.
- Blizzard III Blowout and long debuffsSpreadStack north and south or spread west and east for the late set.
- Mana Release and Ultima UpsurgeEnrageCombine each stored spell tell with the release tell.
- Ultima RepeaterRaidwideMitigate four consecutive raidwides, then separate by role for three autos.
- FloodStackRead the first two waves and dodge all four while stacked.
- Maddening Orchestra ITankbusterShare the tank hit and send the three unhit players in to bait.
- CelestriadFloorFind your element and take the next lit tower clockwise.
P1 · Kefka
/p DMU P1 - JP PF Strat
/p Pull burst at 0s. Trap and riddles: supports W / DPS E.
/p Beam row W to E: H2 H1 OT MT D1 D2 D3 D4
/p Gravity: stack S, lower-right spread, upper-left centre.
/p Teleport: same arrows red, mixed blue.
/p Spread MT 4 OT 3 D1 1 D2 2 / H1 S H2 E D3 W D4 N
/p Stack: supports 3 / DPS 1
P2 · God Kefka
/p DMU P2 - JP PF Strat
/p MT/H1 OT/H2 D1/D3 D2/D4. Supports W / DPS E.
/p Stack pairs: 1 2 3 8. Others: 4 5 6 7.
/p Odd: cone left, single AoE right. Even: H > T > melee > ranged.
/p After 3: single AoE stop, cone bind. Set 8: 1 left / 2 right.
/p Fourth clone: A. Trine party S/E, tanks N/W. MT in, OT edge.
P3 · Exdeath and Chaos
/p DMU P3 - JP PF Strat
/p Chaos OT H2 D1 D2 | Exdeath MT H1 D3 D4
/p D3 far for Umbra. Tank LB3 ~70% Vacuum Wave.
/p Limit cut: count opposite dash two from first landing.
/p Earth heal H before DPS. Queue 1 attack / 2 bind / 3 stop.
/p BH2 attack-bind 1 then 2. BH3 bind-stop 1 then 2.
/p Stomps NW MT/H1 NE OT/H2 SW D1/D3 SE D2/D4
P4 · Kefka Says
/p DMU P4 - JP PF Strat
/p Shield every Cross. Record GC1, element 1, GC2, element 2.
/p Real water stack / lightning solo / bomb stop. Fake reverses.
/p Field opposite wound / Beyond Death same. Fake flood flips floor.
/p Short: beam-relative. Real gaze away, fake gaze in.
/p Late: stack supports N DPS S / spread supports W DPS E.
/p Spikes move on expiry. Donut wait for the ring.
/p Release: matching tells real. Different tells fake.
P5 · Ultima Kefka
/p DMU P5 - JP PF Strat
/p Repeater: four party hits then role autos.
/p Flood: read waves one and two, share all four hits.
/p Orchestra: tanks overlap, unhit three bait next.
/p Holy invuln: MT first, OT second. Flare to edge.
/p Towers: next lit CW from your element. Blank takes leftover.
/p Duplicate facing out: assigned pair left, blank right.
/p Exas: NW/NE alternate three each. Spread after six.
/p Forsaken: start 2, rotate CW on stack, finish at safe cardinal.
Paste into a macro or Party Finder description. Confirm with your party before the pull.
Fight order
P1 · Kefka
P2 · God Kefka
P3 · Exdeath and Chaos
P4 · Kefka Says
P5 · Ultima Kefka
Mechanics
P1 Kefka Push to 14.9% HP to move on
© SQUARE ENIX01Graven ImageSplit west and east, read the riddle, then trade beams for towers.Also: Revolting Ruin III
- Statue tether: the statue tethers one group and knocks it back. Supports west, DPS east before it lands.
- Fire riddle: real fire = do what your icon says (spread or stack). Fake fire = the opposite.
- Ice riddle: real ice = leave the marked area. Fake ice = step in. Melee inside, ranged outside.
- Beams then towers: four beams mark two supports and two DPS. A tower spawns where each beam lands, and the players without a beam soak them.
- Before you pull · TankbusterRevolting Ruin III Two hits: top enmity, then second enmity. JP PF: one tank invulns both, the other only Provokes during the cast and hands enmity back after hit two.
Set supports west and DPS east before the statue tethers one group and knocks you back. Read the fire or ice tell before moving.
- Fire: spread for individual markers and share a stack marker. Reverse that for fake fire.
- Ice: leave the marked area for real ice and step into it for fake ice. Keep melee inside and ranged outside.
- Split: Read the statue tether.
- Line up: Four beams mark two supports and two DPS.
- Trade: Soak the four beam landing spots.
02Double-trouble TrapPass the trap within each role group.Also: Light of Judgment · Hyperdrive
- Who: one support and one DPS get the trap.
- At 0 s: a shared hit on the holder plus a knockback. It then jumps to another player who was hit, so the trap keeps going.
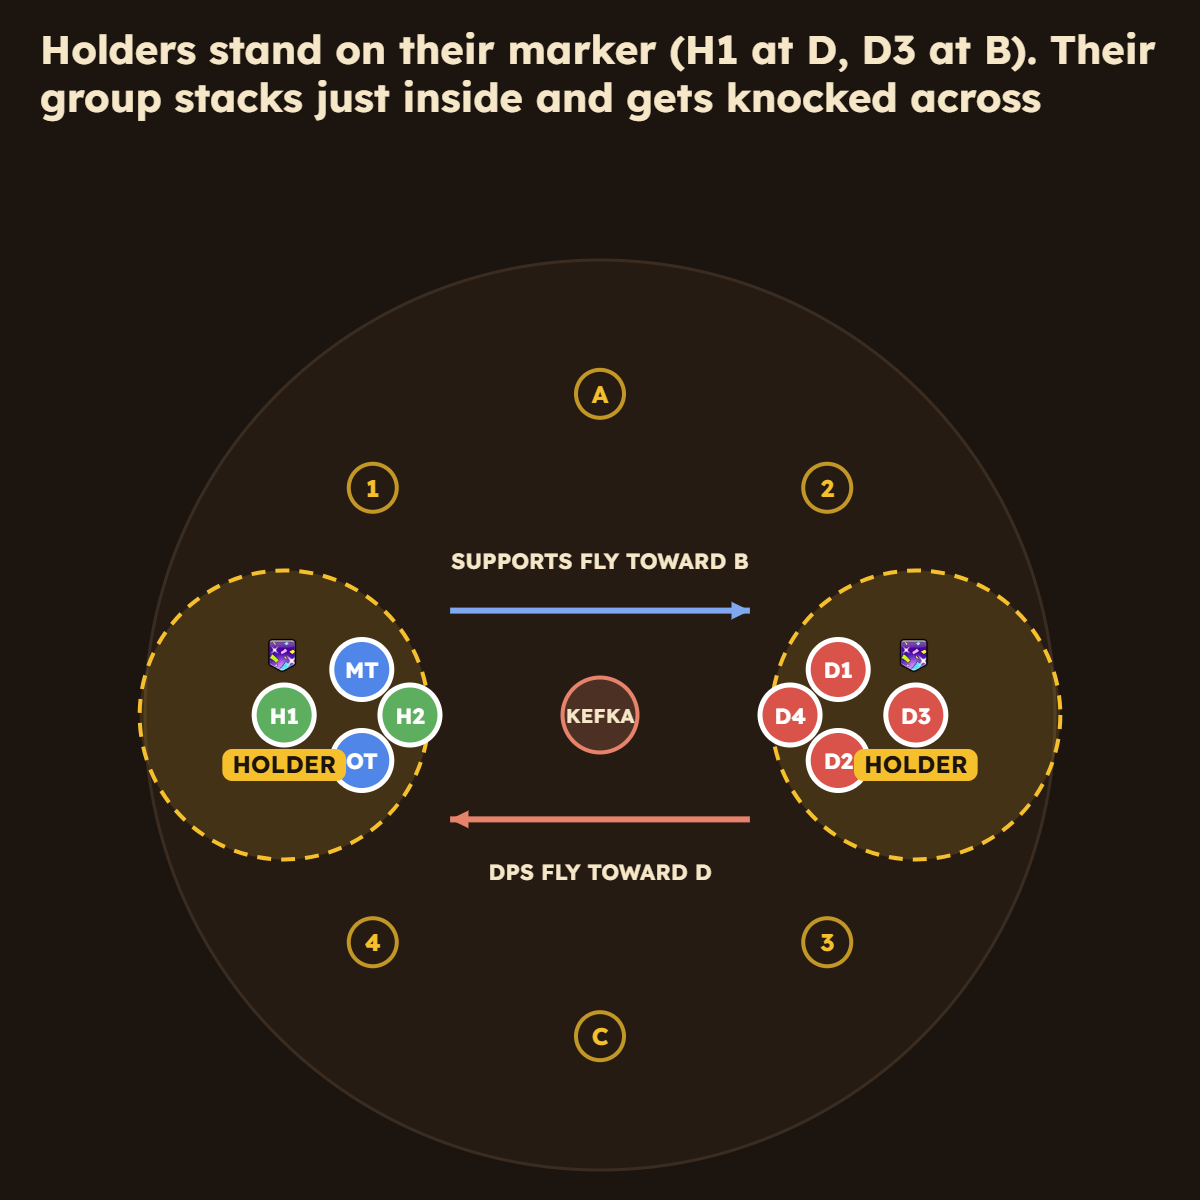
- Where to stand: the support holder stands on D and the DPS holder on B, each group stacked just inside. The knockback throws supports toward B and DPS toward D.
- Never let it drop: every trap must run its full timer. A dropped trap means a fake clear after P2.
Split supports west and DPS east. Each holder stands on their marker (support holder on D, DPS holder on B) with their group stacked just inside. When the timer expires, the holder shares the hit and knocks the group across: supports fly toward B, DPS toward D.
 Double-trouble Trap debuffOne support and one DPSThe holder triggers a shared hit and knockback at expiry.Stand on your marker (support on D, DPS on B). Your group stacks right in front of you.
- Split: Find your role group.
- Aim: Holders stand on their marker, support on D and DPS on B.
- Pass: Share the hit and check the next holders.
- After · RaidwideLight of Judgment Shield and heal up before the tank hits.
- After · TankbusterHyperdrive Three hits on the tank.
03Graven Image IIRead your tether twice and use the trap knockback to soak gravity.Also: Light of Judgment · Hyperdrive
- Gravity: every gravity drop leaves a puddle. First gravity: everyone stacks south.
- Your tether decides your job: lower-right tether (seen from the statue) = an AoE on you, so you spread clear of every puddle. Upper-left tether = a light stack that leaves a gravity bubble, so you go back to the middle.
- Why one group spreads first: it isn't fixed: whichever role gets the lower-right tethers spreads first. The tethers then swap, so the other group spreads on the next set.
- Spread too close: a spread that touches a puddle or another player can wipe the party or knock them off.
- Last step: pass the trap and ride its knockback into the gravity bubbles. They can only be soaked right after the knockback.
Stack south for gravity. Your tether decides your job: facing the statue, a lower-right tether puts an AoE on you, so you spread clear of every puddle. An upper-left tether is a light stack that leaves a gravity bubble, so you go back to the middle. Whichever role gets the lower-right tethers spreads first; the tethers then swap. On the second set the spread spots are the first set flipped north to south, followed by a half-room AoE. Read the statue for the half-room during Ruin III.
- Gravity: Drop gravity together south.
- Separate: Keep every spread off the gravity puddles.
- Repeat: Read the next half-room from the statue.
- Pass: Ride the knockback into gravity and have the holders follow.
- After · RaidwideLight of Judgment Same as before: shield and heal.
- After · TankbusterHyperdrive Three tank hits again, no cast bar this time.
04Tele-trouncingMatch your arrows, place both panels and take your assigned spread or stack.
- Arrows: everyone gets two arrows. Each one drops a teleport panel pointing that way when it runs out.
- Where: same two arrows = a red spot, different arrows = a blue spot.
- Then: pass the trap (supports west, DPS east) and take the fixed spread: melee inside, ranged outside, on the corners of the waymark square.
- Why it matters: all 16 arrows must be used while confused, or the run ends in a fake clear after P2.
Check your two arrow debuffs. Two matching arrows go to a red spot, two different arrows go to a blue spot (follow your own arrow to find it). Pass the trap with supports west and DPS east, then take the fixed teleport spread: melee inside, ranged outside, on the corners of the waymark square.
 Tele-portentEveryone, two arrows eachWhen it runs out, a teleport panel appears under you pointing the arrow’s way.Same two arrows: red spot. Different arrows: blue spot.
- Read arrows: Place both panels in the direction shown.
- Pass: Resolve the trap with your role group.
- Spread: Use inside corners for melee and outside lanes for ranged.
- Stack alternative: Use these spots if fire calls for a stack.
Place panels along the rotation shown in the PF plan. Confirm the starting cardinal for your arrows before the pull.
05Phase transitionPush Kefka to 14.9% or lower.
Finish the three statue puzzles while pushing Kefka to 14.9% or lower. A missed puzzle ends the run after P2.
P2 God Kefka Time limit 6:20
© SQUARE ENIX06ForsakenGroup A sets 1-3 and 8, group B sets 4-7. Odd: stacks on top. Even: cones in front. Then bait Past or Future.Also: Ultimate Embrace · Light of Judgment
- Icons: fixed pairs MT+H1, OT+H2, D1+D3, D2+D4. Everyone starts with an icon: 2 stacks, 3 cones, 3 single AoEs.
- Icons are stored: an icon only goes off when a tower hits you, and that tower gives you a new one. While you're off towers your icon isn't shown, so remember it.
- Towers: 8 sets of 2, each turned 45 degrees from the last. Group A (the pairs with a stack) takes sets 1-3 and 8: after set 3 they mark their icon (single AoE = stop, cone = bind) for set 8. Group B takes 4-7 with the icon they remembered from the start.
- Odd vs even sets: odd sets: stacks on top of the towers. Even sets: cones in front, single AoEs behind.
- Clones and the end: Past's End or Future's End lands with every even set and drops clones that cleave half the room when All Things Ending finishes. Light of Judgment at the end kills anyone still holding an icon.
- Before you pull · TankbusterUltimate Embrace MT and OT stack for it, then go straight to supports west, DPS east.
Before the cast ends, split supports west and DPS east so you can read icons fast. Pairs are fixed: MT+H1, OT+H2, D1+D3, D2+D4. Everyone gets an icon: two stacks (always one support and one DPS), three single AoEs and three cones. Single AoEs all land on one side (supports or DPS) and cones on the other, so each side holds a stack plus three single AoEs or a stack plus three cones.
The two pairs with a stack are group A: they take tower sets 1, 2, 3 and 8. The other two pairs are group B: sets 4, 5, 6 and 7. There are eight sets of two towers and each new set turns 45 degrees, clockwise or counterclockwise. Always read the set with the towers in front of you, below the boss: that's how the animation is drawn too.
 Stack icon (Spelldriver)One support and one DPSA stack on you when you take a tower.Odd sets: the top spot of a tower. Left tower = higher priority (healer > tank > melee > ranged).
 Cone icon (Spellwave)Three players on one sideA cone at the nearest player when you take a tower.Odd sets: bottom of the left tower. Even sets: front spot of a tower, left = higher priority.
 Single AoE icon (Spellscatter)Three players on the other sideAn AoE circle on you alone when you take a tower: keep it off everyone else.Odd sets: bottom of the right tower. Even sets: back spot of a tower, left = higher priority.
- Odd sets (1, 3, 5, 7): stacks take the top spot of each tower, left = higher priority (healer > tank > melee > ranged). The cone goes bottom-left, the single AoE bottom-right.
- Odd sets, the group not in towers: the tank stands in the boss hitbox next to the left stack, the healer baits the cone just behind the left tower, both DPS join the right stack.
- Even sets (2, 4, 6, 8): cones take the front spots (toward the boss), single AoEs the back spots. Left = higher priority, same order.
- Even sets, the group not in towers: tank and melee stand on the boss hitbox, up-left and up-right of the boss (away from the towers). Healer and ranged bait the cones just outside the left and right tower.
- Timeline: a tower set goes off about every 10 seconds. Past's End or Future's End (random each time) lands with sets 2, 4, 6 and 8 and drops clones by the four players closest to Kefka: the tank and melee on the hitbox plus the two cone players. That's why those spots matter.
- About 5 seconds after the clones land, All Things Ending starts casting: the clones turn to the party and lock. When it finishes, each clone cleaves half the room: in front of it after Future's End, behind it after Past's End. It goes off together with the next odd set.
- Past's End: after it lands, everyone stacks on MT between the towers until All Things Ending starts casting, then takes the next towers. Future's End: everyone stacks together on the far side, at the north edge of Kefka's circle, and runs back to the towers as soon as All Things Ending starts casting.
- Baiting All Things Ending: stand at max melee, not on the target circle, or the angle gets wide. On odd sets it can clip the right-tower stack: shift a little counterclockwise (to the right as you face the boss) or have that stack lean in slightly, but not so far that the stack hits the left tank.
- After set 3, mark your new icon: single AoE = /mk stop <me>, cone = /mk bind <me>. Set 8 uses the marker numbers: 1 takes the left tower, 2 the right.
- After set 8 (fourth Past/Future, no more towers): everyone gathers at A. Past's End: stay at A. Future's End: once All Things Ending starts casting, run through to the other side. Light of Judgment follows: anyone still holding an icon dies.
- The whole mechanic, one step per click, with the cast bar and the real timings (phase timer). Each set shows where everyone stands, then how the icons go off. Past's End or Future's End is random each time; this example roll shows both. Use Play all to watch it run on its own. Stacks start on MT and D2.
Keep the same set ownership. On odd towers put the support stack left and the DPS stack right. The off-tower tank helps the left stack, the healer baits behind it, and both off-tower DPS help the right stack.
- Read icons: Identify both pairs containing a stack.
- Odd towers: Off-tower players fill the stacks and bait the cone.
- Change groups: Remember the new icon after set three.
Keep the fixed buddies. Cones go left and circles right. Tank and melee flex when assignments collide. On set two a cone player baits inside the tower and a circle waits behind each tower.
- Read icons: Identify both pairs containing a stack.
- Flex: Keep the cone left and the circle right.
- Set two: The cone player also baits a clone.
- After · RaidwideLight of Judgment Mitigate and heal. Anyone still carrying a tower charge dies.
07Trine and Wings of DestructionEnter the first triangle and give the tanks nearest and farthest.Also: Ultimate Embrace
- Triangles: they fall in three sets and explode. The third set always lands in the middle.
- Wings first: Kefka cleaves one half of the room, then the other (left or right first is random). Triangles 1, 2 and 3 appear during this cast.
- When to move: after the two halves, go back to the middle, wait for the 1s to explode, then run into a cleared 1.
- Tank buster: Wings also hits the closest and farthest player: MT stays close, OT goes to the very edge. Healers and DPS check south then east for the safe spot, tanks north then west.
Kefka cleaves one half of the room, then the other (left or right first is random). The triangles 1, 2 and 3 appear during this cast. Stand on the safe side, then cross. After the second half, go back to the middle, wait for the 1s to explode, then run into a cleared 1. Set 3 always lands in the middle.
Wings of Destruction also hits the nearest and farthest player hard. Healers and DPS look for their safe spot south first, then east; tanks look north first, then west. MT stays close to the boss (mind the triangles), OT goes to the very edge, and healers and DPS stand near the edge but not on it.
- Read: Remember which triangle fell first.
- Dodge: Check the safe side of the wing.
- Bait: MT and OT take nearest and farthest.
Start the party’s search at north and check clockwise. Tanks start northwest and check counterclockwise. MT still takes nearest and OT farthest.
- Start: Locate the first triangle.
- Search: Follow the safe wing and triangle.
- Set distance: Leave the two distance baits to tanks.
- After · TankbusterUltimate Embrace Both tanks stack again. Finish the phase before the 6:20 enrage.
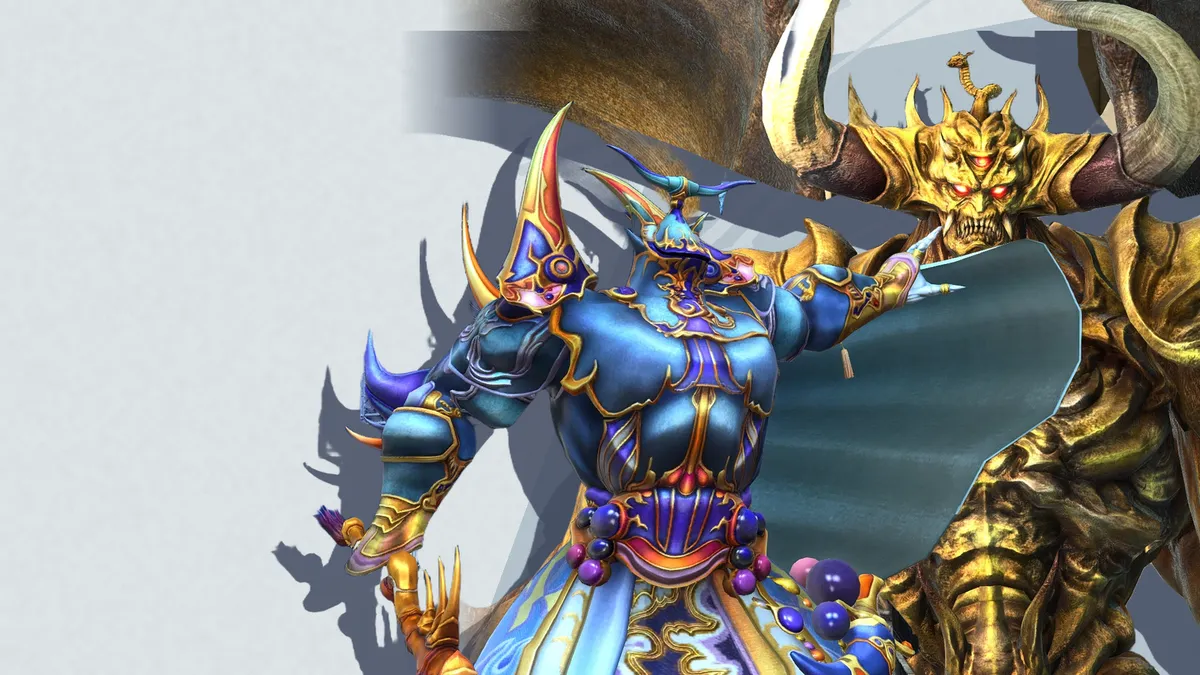
P3 Exdeath and Chaos Giant Kefka untargetable
© SQUARE ENIX08The Decisive Battle IJoin your assigned boss before the proximity buffs go out.
OT, H2, D1 and D2 move to Chaos. MT, H1, D3 and D4 move to Exdeath. Attack the boss your buff allows.
 Epic HeroFour closest to ChaosAllows damage against Chaos.Stay with the Chaos party.
 Fated HeroFour closest to ExdeathAllows damage against Exdeath.Stay with the Exdeath party.
09Bowels of AgonyRead the crystals, cleanse wind and tank LB3 the group knockback.
- Groups: MT, H1, D3, D4 on Exdeath. OT, H2, D1, D2 on Chaos. Chaos goes onto the wind crystal, Exdeath to the far side.
- Debuffs: Entropy (small AoE on you, then fire hits the two closest with donuts) and Dynamic Fluid (donut on you, then water hits the two closest), each on one support and one DPS. Fire or water can go first. Everyone also gets Headwind or Tailwind.
- Thunder III: when Exdeath starts casting it, MT leaves him and joins the Chaos group. Then his double buster: MT goes back under him and invulns both hits.
- Implosion: Chaos cleaves two opposite quarters, then the other two, across the whole arena. Two kinds, so read the cast name: Longitudinal = front and back first, then the sides. Latitudinal = sides first, then front and back. Each crystal fires a moment after its debuff.
- Why LB3: Vacuum Wave hits all eight at once, so the tank LB3 goes out at about 70% of the cast. Stand right next to Exdeath: the knockback pushes you away from him, so starting close keeps you on the platform. D3 baits Umbra Smash far away first.
Chaos casts Bowels of Agony: a raidwide, then debuffs. Fire and water crystals spawn on opposite waymark numbers, with wind on one of the two numbers between them. The short set of debuffs goes off first.
 EntropyOne support and one DPS, short or longRuns out: a small AoE on you. The fire crystal then shoots donuts at the two closest players.Shield it and keep it off the others.
 Dynamic FluidOne support and one DPS, short or longRuns out: a donut on you. The water crystal then hits the two closest players.Stand on your TLB3 spot.
 HeadwindEveryone gets Headwind or TailwindFrontal wind. A knockback from the front clears it.Take Vacuum Wave facing Exdeath.
 TailwindEveryone gets Headwind or TailwindRear wind. A knockback from behind clears it.Take Vacuum Wave with your back to Exdeath.
- Groups: MT, H1, D3 and D4 on Exdeath. OT, H2, D1 and D2 on Chaos.
- JP TLB3: Chaos goes onto the wind crystal and Exdeath to the far opposite side. Everyone else takes a fixed spot worked out from the wind and water crystals: D1 and D2 together at the edge behind the wind crystal. If the crystals are mirrored, so are the spots.
- MT stays on Exdeath until he starts casting Thunder III, then joins the group at Chaos. The first debuff set (fire or water, always one support and one DPS) goes off with Thunder III. Each crystal fires a moment after its debuff, not at the same time.
- Fire first: the fire crystal shoots donuts at the two closest players, the stacked supports. Stay tight so everyone is inside both holes.
- Exdeath's double Thunder III buster hits the closest player twice: MT goes under him and uses an invuln for both hits. Everyone else stays away.
- Chaos's implosion cleaves twice across the whole arena: two opposite quarters, then the other two. There are two kinds, so read the cast name: Longitudinal Implosion hits the front and back of Chaos first, then the sides. Latitudinal Implosion hits the sides first, then the front and back. Dodge, then cross. The second debuff set goes off right after.
- Exdeath then goes onto the wind crystal and everyone stacks there. D3 baits Chaos's Umbra Smash far away: its damage drops with distance.
- Vacuum Wave: stack right next to Exdeath. It knocks everyone away from him, so hugging him keeps you on the platform. The tank presses LB3 at about 70% of the cast. Mitigate, it hits all eight.
- Spots: Chaos on wind, Exdeath opposite, TLB3 spots from wind and water.
- Thunder III: MT joins the Chaos group, the first debuff set goes off.
- Buster: MT invulns both hits under Exdeath.
- Implosion: Dodge two quarters, then the other two. The second set goes off.
- Vacuum Wave: D3 baits Umbra Smash, everyone stacks next to Exdeath, tank LB3 at about 70%.
10Ultima BlasterNumber from the first landing in the direction opposite dash two.
- Dashes: Kefka dashes 8 times, clockwise or counterclockwise.
- Your number: the first landing is spot 1. If dash two turns clockwise, count 1-8 counterclockwise, and the other way round.
- Then: the nearest player takes Exdeath's lightning buster.
Watch the first landing during Vacuum Wave. If dash two turns clockwise, lay out 1–8 counterclockwise from the landing. Reverse the line if dash two turns counterclockwise.
- Anchor: Treat the first landing as position one.
- Read: For a clockwise second dash, count counterclockwise.
- Line up: The nearest player then takes Exdeath’s lightning buster.
11The Decisive Battle IIJoin your assigned boss before the proximity buffs go out.
OT, H2, D1 and D2 move to Chaos. MT, H1, D3 and D4 move to Exdeath. Swap the closest tank for Thunder III.
Epic HeroFour closest to ChaosAllows damage against Chaos.Stay with the Chaos party.Fated HeroFour closest to ExdeathAllows damage against Exdeath.Stay with the Exdeath party.12EarthquakeTop the marked healer first, then the marked DPS after vulnerability expires.
- Accretion: one healer and one DPS. Heal them to full to clear it: healer first, then DPS.
- Why stagger: each clear hits the party and gives 2 s of earth vulnerability, so a second clear inside that window hurts.
- Crust: everyone has Primordial Crust: three beams take you to 1 HP and clear it.
- Queue: mark yourself: first in line attack, second bind, third stop.
Heal each Accretion holder to full. Each cleanse pulses raid damage and applies two seconds of earth vulnerability. Mark your queue before the first tether.
 AccretionOne healer and one DPSFull HP clears it and triggers a party hit.Heal the healer first, then the DPS.
 Primordial CrustEveryoneReaching 1 HP clears the crust.Take your three assigned beams.
 First in LineThree playersSets your tether deadline.Use /mk attack <me>.
 Second in LineThree playersSets your tether deadline.Use /mk bind <me>.
 Third in LineTwo playersSets your tether deadline.Use /mk stop <me>.
 Earth Resistance DownParty on a cleanseAnother earth hit is dangerous during the vulnerability.Stagger the heals.
13Black HoleCount clockwise from giant Kefka and hand off the designated tethers.
- Goal: 4 Black Holes, 3 beams per player. Beam 1: Unbecoming, beam 2: Meanest Existence, beam 3 breaks Primordial Crust (1 HP) and hits the whole party with earth, so only one crust breaks per wave.
- Fixed order: Slap Happy, BH1 (1, 2), buster (invuln), Slap Happy, BH2 (3, 3, 3), Look Upon Me, buster (swap), BH3 (3, 3, 3), White Hole + Slap Happy, BH4 (2, then 1 during Look Upon Me).
- Kefka: he keeps reappearing at a random spot; each new spot is north. Slap Happy punches one side, then the middle: right side = 3 role cones, left side = 1 cone for the whole party. Look Upon Me: a line through the middle, step aside.
- Chaos and Exdeath: Damning Edict is a front cleave: the first one aims at a random player; for the second, tanks turn Chaos toward or away from Kefka. Dodge it first, then Kefka. Buster takers go far out to a waymark. White Hole needs full HP.
- Tethers: marker order (attack, bind, stop), counting clockwise from Kefka; tether holes are always cardinals. Aim the beam clockwise; only Black Hole 1's first tether waits counterclockwise.
There are 4 Black Holes. Everyone has Primordial Crust: it blocks healing, and it only breaks on a hit that would kill you, leaving you at 1 HP. Each player takes exactly 3 beams (24 tethers in total): beam 1 gives Unbecoming, beam 2 Meanest Existence, beam 3 breaks the crust and sends an earth hit through the whole party. That is why the strat clears only one crust per wave. Your Earthquake status sets your marker: First in Line = attack 1-3, Second in Line = bind 1-3, Third in Line = stop 1-2.
Giant Kefka appears at a random spot on the edge, and wherever he is becomes north. He keeps vanishing and reappearing (sometimes on the same spot), and every time he does, the new spot is north.
- Kefka appears at a random spot and opens with Slap Happy. Then Black Hole 1: 1 tether, then 2.
- Exdeath's double tank buster (usually invuln). Kefka reappears. Chaos casts Damning Edict, a front cleave aimed at a random player, while Kefka casts his second Slap Happy: dodge Damning Edict first, then Kefka.
- Black Hole 2: 3, 3, 3. Before the third wave goes off, Kefka reappears: tanks turn Chaos toward or away from him for the second Damning Edict, then Look Upon Me.
- Exdeath's double tank buster again (swap).
- Black Hole 3: 3, 3, 3. At the third wave Kefka reappears.
- Exdeath casts White Hole (only survivable at full HP: top everyone), Chaos casts Implosion, Kefka casts Slap Happy. Dodge Implosion, then Slap Happy.
- Black Hole 4: 2 tethers, then 1. Between them Kefka reappears and casts Look Upon Me: the last beam goes off while everyone dodges it. Then Stomp-a-Mole.
This order is fixed. Only the side Slap Happy punches is random.
- Slap Happy: Kefka punches three times on one side of the arena (with Kefka as north), then a fourth time in the middle. Only the side is random: watch which side his cast goes to. He does it three times: at the start, after the first buster, and with White Hole. The middle punch sends cones to the other side: punches on the right = three role cones (tanks, healers, DPS each share one); punches on the left = one cone shared by the whole party.
- Look Upon Me: a wide line from Kefka through the middle. Step to the side.
- Tethers go out in marker order, counting black holes clockwise from Kefka. Tether black holes are always north, south, east or west. The beam runs from your black hole through you: aim it clockwise (stand by the number clockwise of your black hole). Only the very first tether of Black Hole 1 waits counterclockwise.
- Hand-offs: BH2 attack 1 to bind 1, attack 2 to bind 2. BH3 bind 1 to stop 1, bind 2 to stop 2.
- Exdeath's tank busters: whoever takes them goes far out, to a waymark. The first one is usually a single tank with an invuln (swap if you are pushing damage), the second one is a swap.
- Everyone without a tether stacks in the middle.
Black Holes 1 and 2
Black Holes 3 and 4
- Find north: Giant Kefka is north. Start at the first black hole clockwise from him.
- Aim: Stand by the number clockwise of your black hole (Black Hole 1's first tether: counterclockwise).
- Hand off: Attack to bind in BH2, bind to stop in BH3.
Rank each queue by DPS first, then support, then the Accretion holder. Start clockwise from Kefka and take over as earlier players finish their three hits.
- Sort: Use the queue number before applying priority.
- Start: Aim away from the party.
- Hand off: Rotate ownership when the previous player finishes.
14Stomp-a-MoleBait ice in the middle, spread to quadrants and trade stacks for towers.
- North: the direction the last Look Upon Me came from.
- Bait, then get out: everyone stacks in the middle to bait the AoE, then moves out to the intercardinals before it explodes: 4 pairs, MT+H1, OT+H2, D1+D3, D2+D4. Read Kefka's feet when the cast ends.
- Stacks vs towers: whichever role has the stack markers stacks; the other role takes the towers. Then the roles swap for the second set.
- Keep moving: after the swap, keep moving so the ice doesn't freeze you, and kill both bosses before the enrage (Meteor and Bowels of Agony).
Use the last Look Upon Me direction as north. Start together for ice, read Kefka’s feet at cast end and split to paired corners. The marked role stacks centre and the others fill two towers.
- Bait: Drop ice in the middle.
- Pairs: Take paired corners relative to the last cut.
- Support stack example: DPS share the two towers.
- Trade: Move off the old stack spikes and keep moving through ice.
- Kill both bosses before Meteor and Bowels of Agony finish.
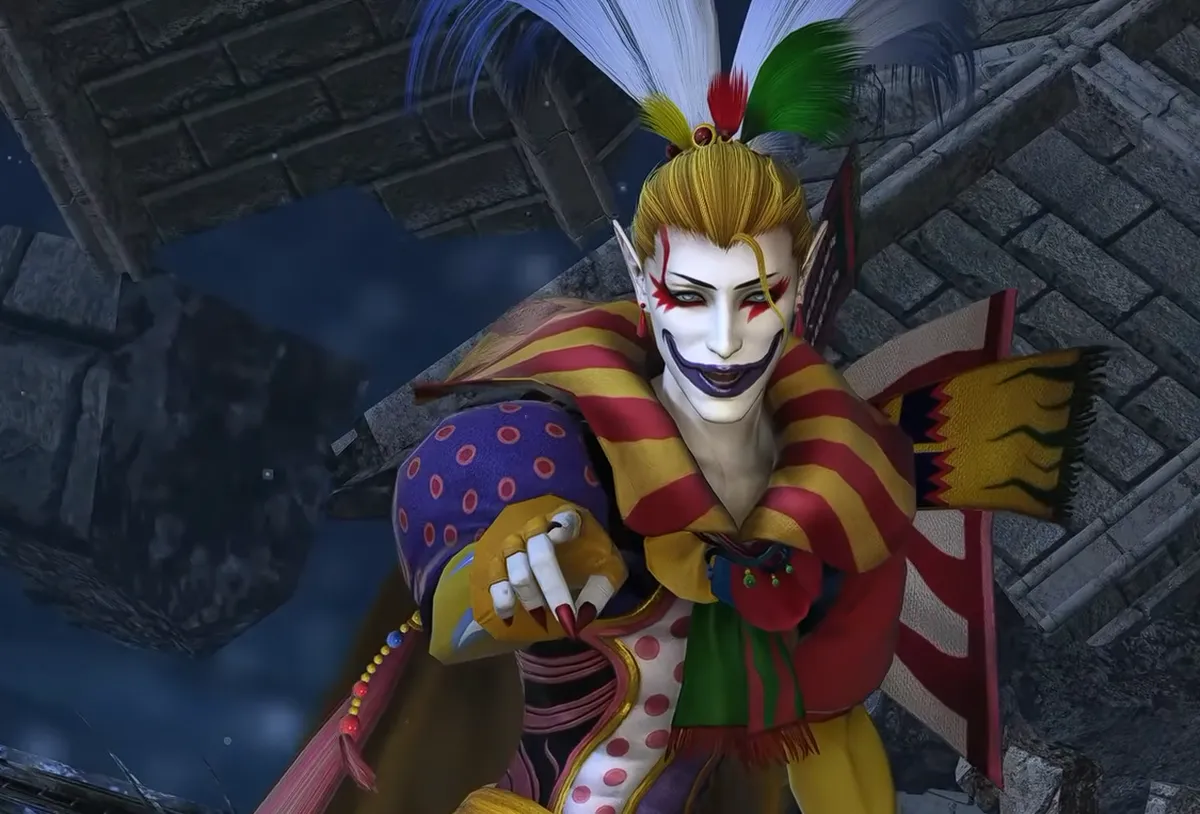
P4 Kefka Says Neo Exdeath + Chaos, Kefka targetable
© SQUARE ENIX15Kefka Says: debuffsEvery cast that gives a debuff, its real and fake rule, and what to write down.
- Real or fake: every cast in this phase has a tell. Grand Cross sets Water, Lightning, Cursed Shriek and Acceleration Bomb; Tsunami or Inferno sets Dynamic Fluid or Entropy.
- Why /echo: the debuffs go off much later, short ones first, long ones near the end, so write each tell down in order.
- Kefka records too: Mana Charge remembers Thrumming Thunder III and Blizzard III Blowout; Mana Release repeats them (both real or both fake = real, one of each = fake).
- Raidwide: shield every Grand Cross.
Every cast in this phase shows a real or fake tell. The debuffs go off much later, short ones first and long ones near the end, so write each tell down with /echo, in order.
 Compressed WaterGrand Cross 1 and 2StackSpread
 Forked LightningGrand Cross 1 and 2SpreadStack
 Cursed ShriekGrand Cross 1 and 2: one support, one DPS. Holders gather in the middleLook away from the holdersLook at the holders
 Acceleration BombEveryone, on Grand Cross 1 or 2Stand still, no actionsKeep movingDynamic FluidTsunami: everyoneDonut around youCircle under you, explodes a few seconds laterEntropyInferno: everyoneCircle under you when it runs outDonut around you
 Black WoundGrand Cross 3Black Antilight is lethalWhite Antilight is lethal
 White WoundGrand Cross 3White Antilight is lethalBlack Antilight is lethal
 Allagan FieldGrand Cross 3: four playersDon't take lethal damage, or the party wipesTake lethal damage, or you explode
 Beyond DeathGrand Cross 3: the other fourTake lethal damage to clear itAvoid lethal damage
The casts, in order
- 1Kefka Says (Kefka): he brings back Chaos and Neo Exdeath. From now on every cast from all three is real or fake.
- 2Mystery Magic 1 (Kefka): Blizzard and Thunder AoEs with a real or fake tell. Dodge them.
- 3Grand Cross 1 (Neo Exdeath): a raidwide, shield it. Its tell decides Compressed Water, Forked Lightning, Cursed Shriek and Acceleration Bomb.
- 4Tsunami or Inferno (Chaos, shortly after Grand Cross 1 starts): Dynamic Fluid or Entropy on everyone. Its own tell decides it.
- 5Mystery Magic 2, Grand Cross 2 and Chaos's other element: the same debuffs again, but nobody gets the same one twice. Chaos casts whichever of Tsunami or Inferno he did not cast before. Short timers go off after Grand Cross 3, long ones later.
- 6Mystery Magic 3, Grand Cross 3 (Neo Exdeath): Black or White Wound on everyone, Allagan Field on four, Beyond Death on the other four. The Wound and the Field or Beyond Death are always both real or both fake.
You now hold everything. Next section: resolving it in order.
16Kefka Says: resolveFlood of Naught, then each debuff as it goes off, then Mana Release and the enrage.
- Order: Flood of Naught, short Water/Lightning/Bomb, Thrumming Thunder III with the short gaze, short Fluid or Entropy, Blizzard III Blowout with the long set, long gaze, Mana Release, Ultima Upsurge.
- Flood: Allagan Field takes the colour opposite its Wound, Beyond Death the same colour; a fake flood flips it. Grand Cross 3's tell doesn't matter here.
- Each expiry: use the Real or Fake rule you wrote down for that debuff. The long set repeats the short one.
- Mana Release: both real or both fake = real, one of each = fake. Get Kefka below 25% before Ultima Upsurge.
Everything you wrote down in the debuff phase goes off here, in this order.
- 1Flood of Naught (Neo Exdeath): he moves to a random cardinal or intercardinal and cleaves both halves, one black and one white. A fake flood swaps the colours. Stand a bit to the side: the cleaves overlap in the middle.
- Allagan Field: Real stand in the colour opposite your Wound. Fake stand in the same colour.
- Beyond Death: Real stand in the same colour as your Wound. Fake stand in the opposite colour.
- Because the Wound and the Field or Beyond Death flip together, this works whatever Grand Cross 3 said: only the flood's own tell matters.
Your case - 2Short Water, Lightning and Bomb go off. Supports stack north, DPS south; the spreading support goes west, the DPS east. Spread relative to Neo Exdeath's beam. Kefka casts Mana Charge: it records whether the next Thrumming Thunder III and Blizzard III Blowout are real or fake.Real
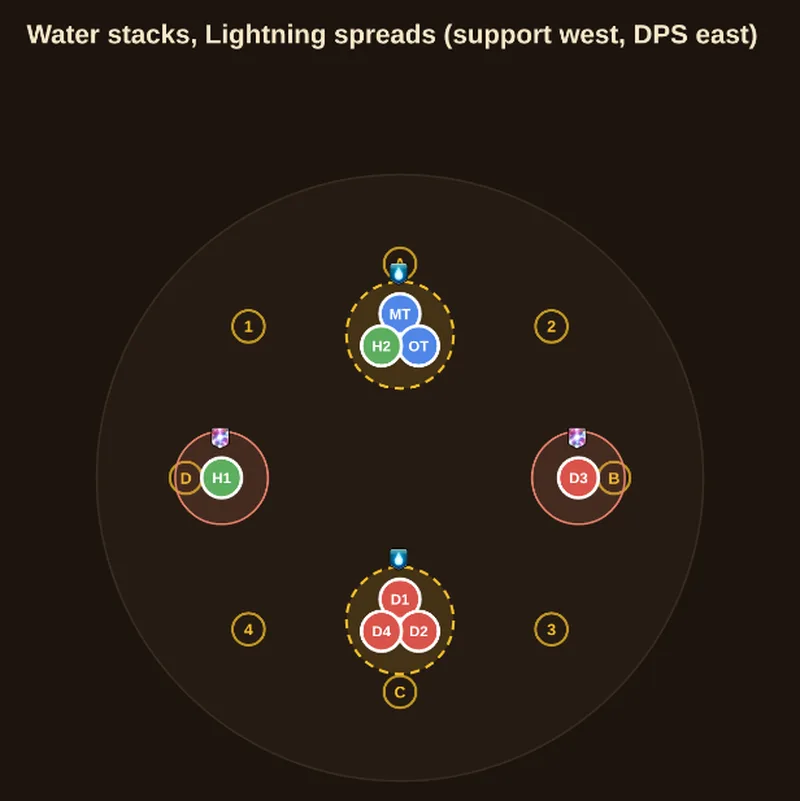 Fake
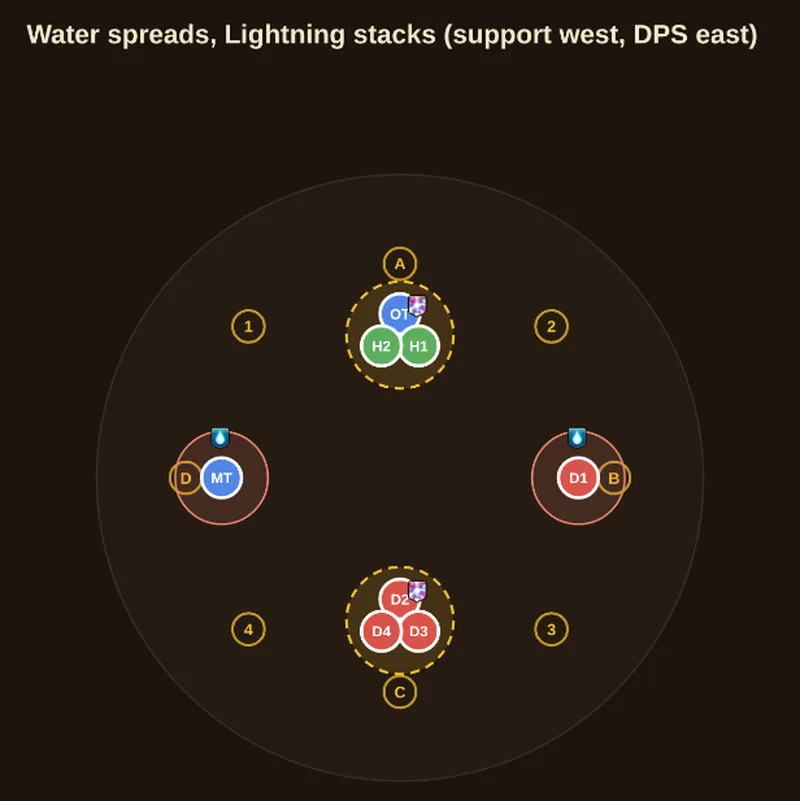 Real
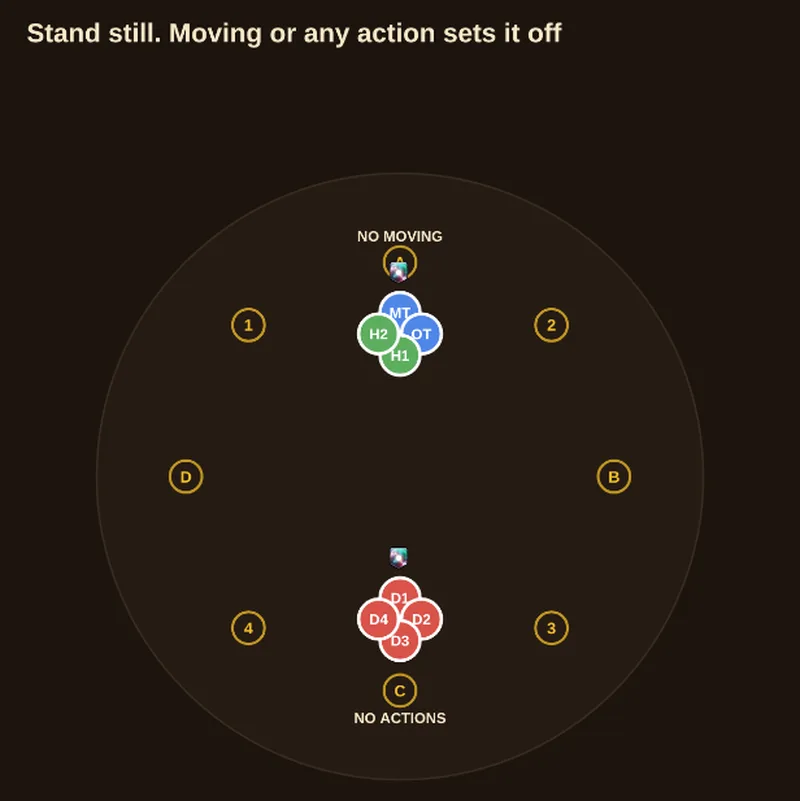 Fake
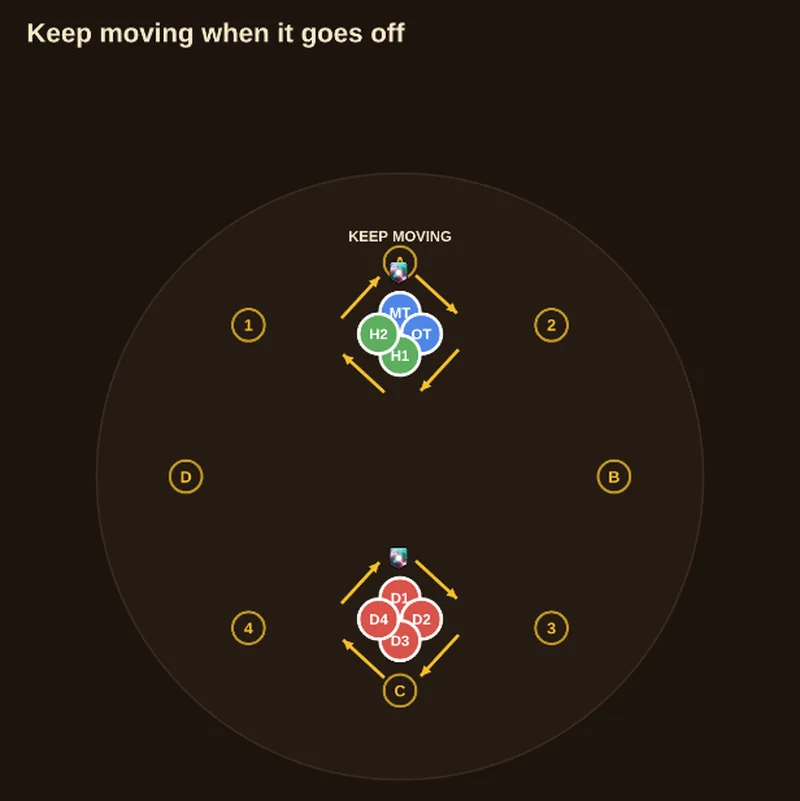
- 3Thrumming Thunder III (Kefka): Thunder line AoEs, dodge them and remember the tell. The short Cursed Shriek goes off at the same time:
- Cursed Shriek: Real holders gather in the middle; everyone looks away from them. Fake holders gather in the middle; everyone looks at them.
Real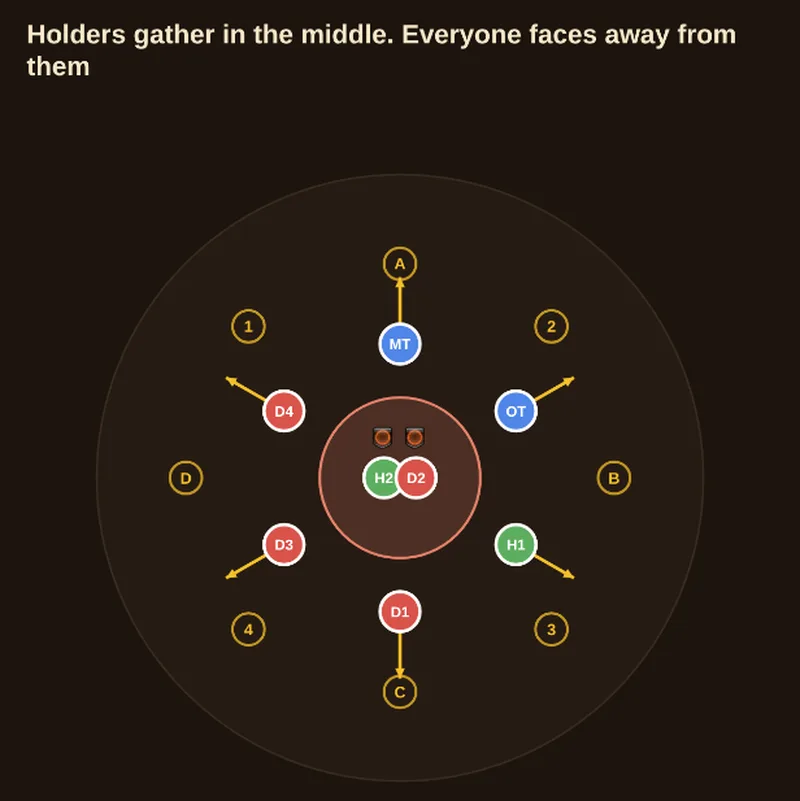 Fake
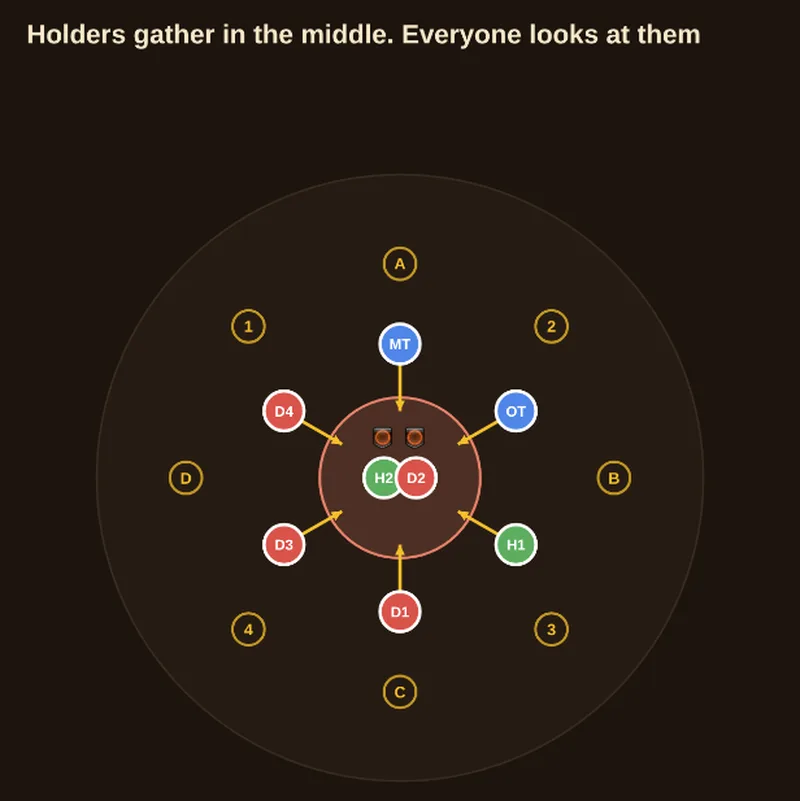
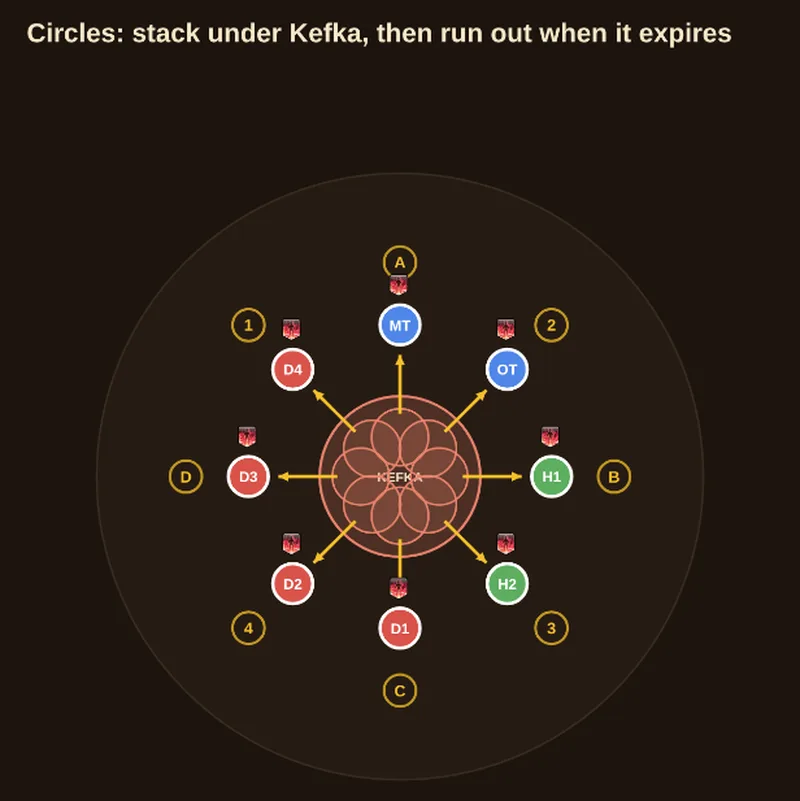
- 4Ultima Upsurge (Kefka): a raidwide. Then the short Dynamic Fluid or Entropy (from Chaos's second cast) goes off: stack under the boss. Donut: don't move. Circle: run out when it expires.Real Fluid Fake Entropy
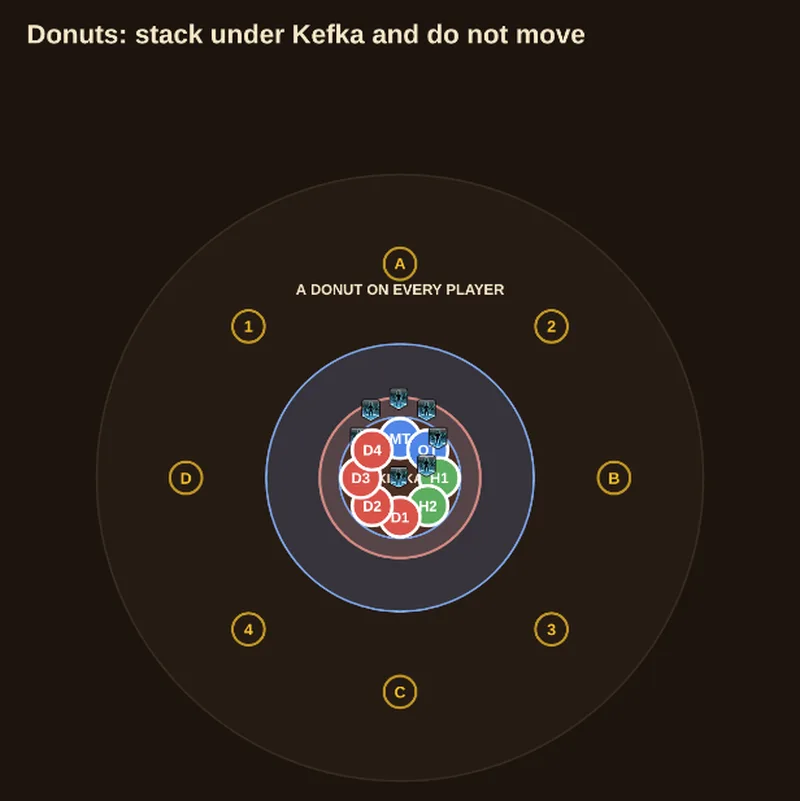 Real Entropy Fake Fluid
- 5Blizzard III Blowout (Kefka): 90-degree cleaves, dodge them and remember the tell. The long Water, Lightning and Bomb go off now, same as step 2.
- 6Long Cursed Shriek goes off just before Mana Release, same as step 3.
- 7Mana Release (Kefka): repeats the Thunder and Blizzard he recorded. For each element: both casts real = real, both fake = real, one of each = fake. The long Dynamic Fluid or Entropy goes off as the cast ends, same as step 4.
- 8Ultima Upsurge again: Kefka only casts it once he is at 24.9% HP or lower, so push him there.
Who holds which debuff in the diagrams is an example.
Mark your gaze assignment. The support gaze holder uses the north side and the DPS gaze holder uses the south side. Keep the original Cross tell for facing.
- Mark: Locate the support and DPS gaze holders.
- Separate: Give each gaze holder their side.
- Face: Resolve using the Cross that gave this gaze.
P5 Ultima Kefka The final stretch - stay calm and overcome
© SQUARE ENIX17FloodFour wave patterns are shown in order, then hit in the same order. Run round the east side.Also: Ultima Repeater
- Repeater first: four raidwides, then split into tanks, healers and DPS for the autos.
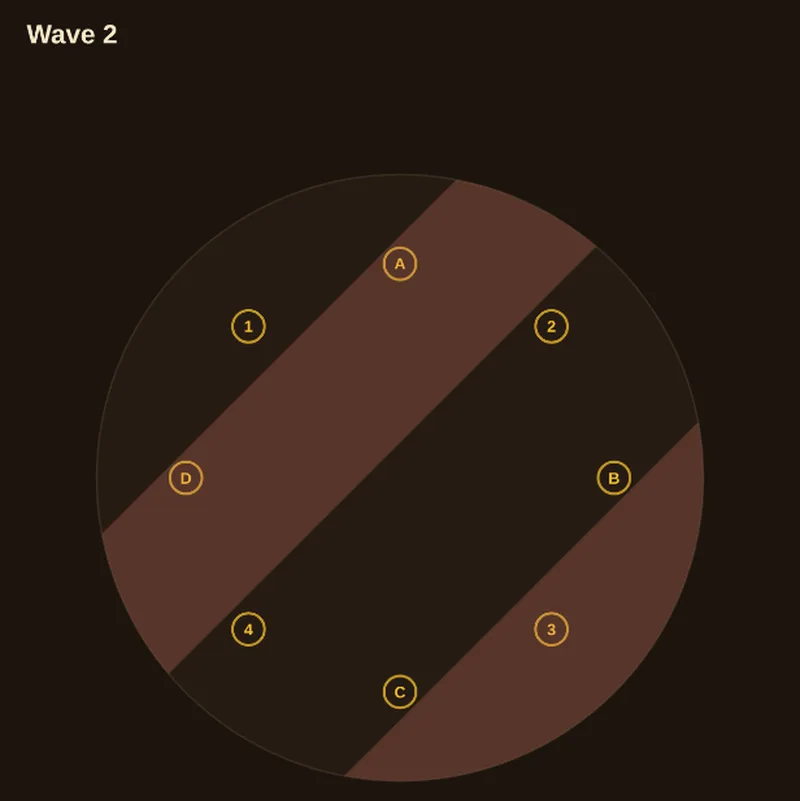
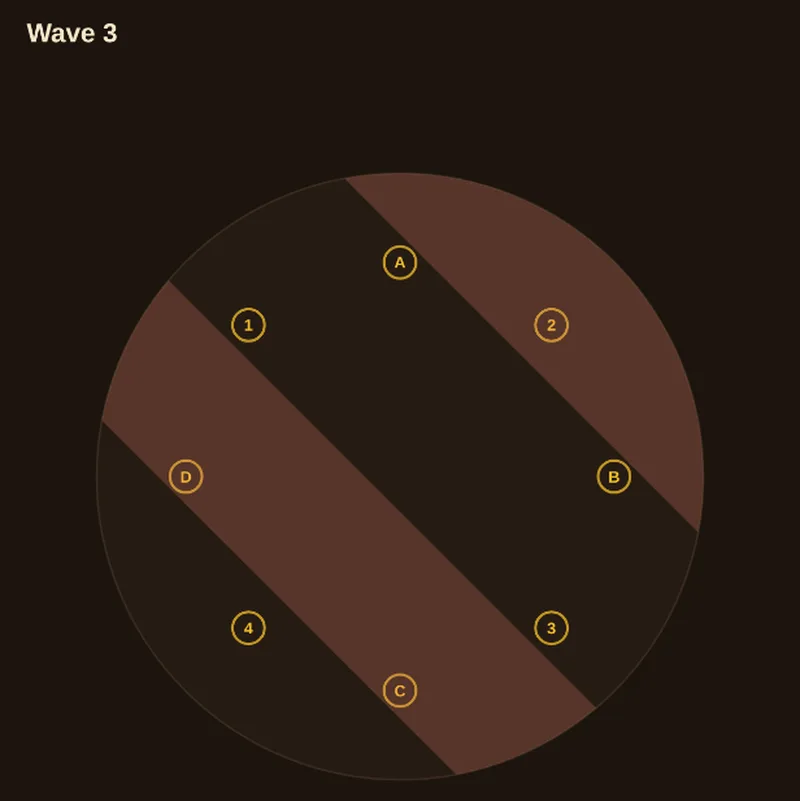
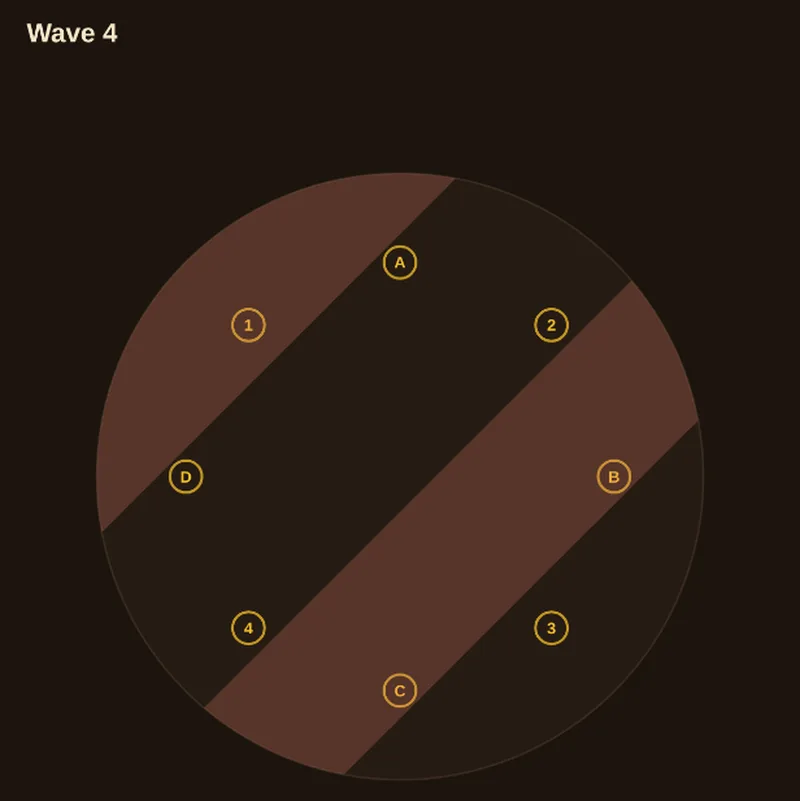
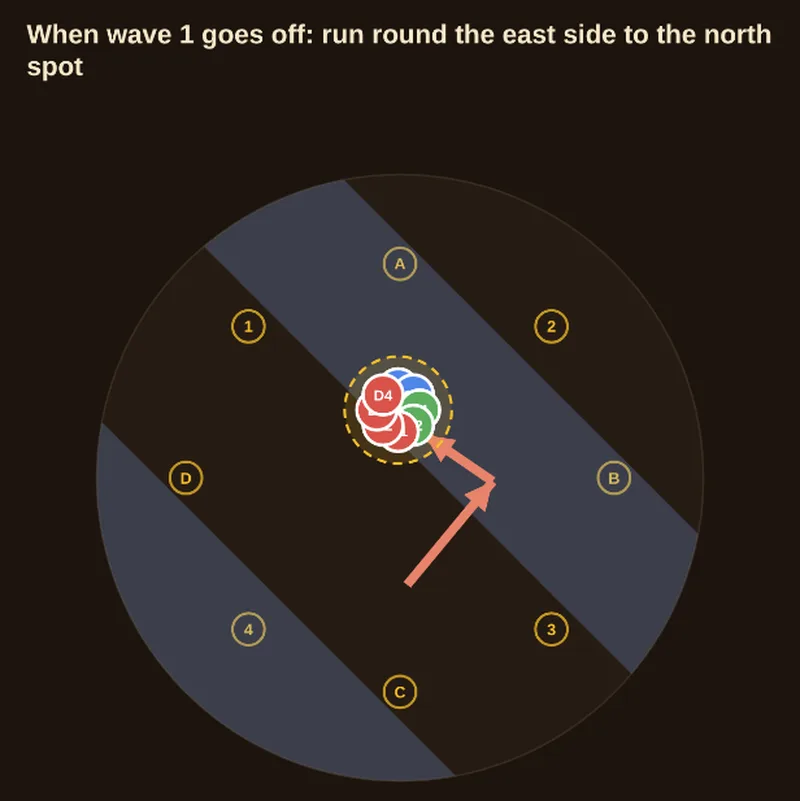
- Flood: four wave patterns are shown first, 1 to 4, then hit in the same order. Stay stacked and run round the east side as shown in the last diagram.
- Before you pull · RaidwideUltima Repeater Four raidwides in a row, then split tanks, healers and DPS into three groups for the autos (tank hit on top enmity).
Shown in this order, then they hit in the same order:
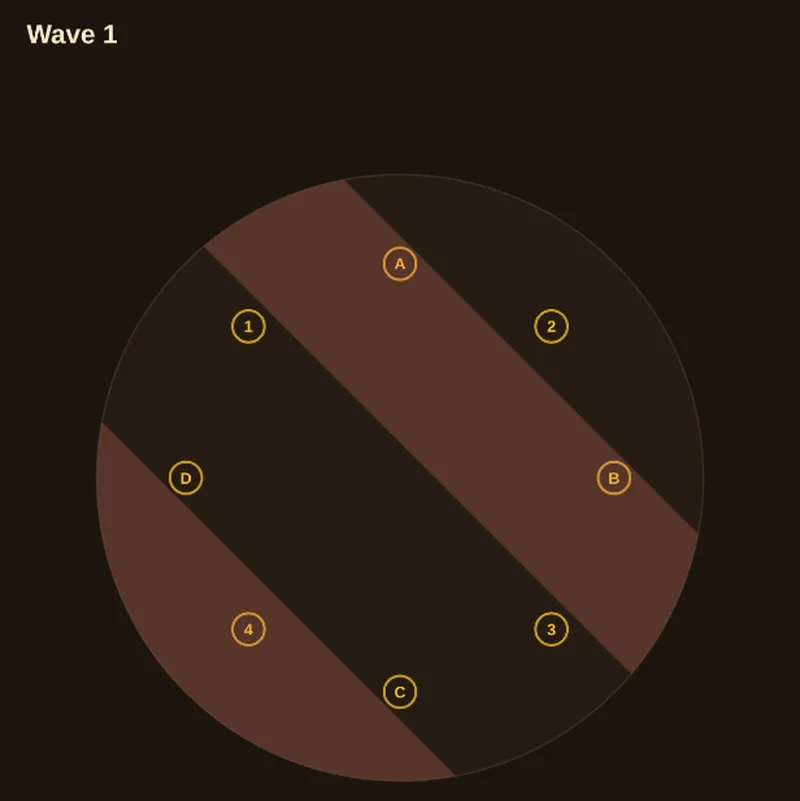
How to run
18Maddening Orchestra ITwo single tank busters, then a shared one. The three unhit players bait.
- Busters: a single buster on each tank (stay apart), then a shared one (tanks stack together).
- Baits: the three non-tanks the first circles miss go in and bait the next set.
- Holy and Flare: MT swaps to hold the boss and invulns Holy. OT takes Flare to the edge: it covers at least two thirds of the arena.
- After: two autos.
Each tank first takes a single buster (stay apart), then the tanks stack for a shared buster. The three non-tanks missed by the first circles move close to bait the next set. MT swaps to hold the boss still and invulns Holy. OT carries Flare to the edge. Two autos follow.
 Flare markerTank first in enmity at assignmentA large blast follows the holder.Take it to the outer edge.
 Holy markerTank second in enmity at assignmentA shared hit overlaps Flare.Invuln Holy.
- Busters: One on each tank, then a shared one.
- Bait: The three unhit players bait the second AoEs.
- Separate: The Holy tank invulns and holds the boss.
Group both healers south. Put one melee and one ranged on each side, west and east. The three players who missed the first circles still bait next.
- Set roles: Keep one melee and one ranged on each side.
- Bait: The three unhit non-tanks bait.
- Resolve: Send Flare to the edge and invuln Holy.
19CelestriadThree tower sets. From your element, take the next lit tower clockwise.Also: Ultima Repeater II
- Pairs: two each with Lightning, Ice or Fire Resistance Down, two with nothing.
- Towers: nine spots on a ring: lightning NE-E, ice SE-SW, fire W-N. Three sets, four lit each time, one element twice.
- Your tower: from a lit tower of your element, take the next lit one clockwise. The doubled element's pair counts from the right one; no debuff takes the leftover (the right one).
- Catastrophic Choice: on sets 1 and 3 it goes off with the towers: it covers half of each tower: wind = donut, stand on the inner half; earth = AoE in the middle, stand on the outer half.
- Keep moving: each tower adds its vulnerability, so you can't take that element again: go clockwise to the next lit element you are not vulnerable to. Tower elements never change.
- After: Ultima Repeater II: four pulses, then two autos.
Eight players split into four pairs by debuff: two with Lightning Resistance Down, two with Ice, two with Fire, and two with none. Nine tower spots sit on a ring around Kefka in three groups: lightning northeast to east, ice southeast to southwest, fire west to north. Towers come three times, and each time four of them light up, one element twice.
- Find a lit tower of your debuff's element, then take the next lit tower clockwise from it.
- The element that shows twice: seen from the middle, the left one goes to a debuff pair (whoever counts into it), and that element's own pair counts clockwise from the right one.
- No debuff: take the tower that is left over, always the right one of the doubled element.
- Every tower spot always has the same element in this phase.
- A tower gives you its element's vulnerability on top of the one you have. For set 2, go clockwise from your tower to the next lit tower of the element you are not vulnerable to. For set 3 your first debuff has run out, so do the same with the two you hold now.
- While you take towers 1 and 3, Kefka casts Catastrophic Choice, an in or out. It goes off together with the towers. It covers half of each tower. Wind around Kefka = a donut over the outer half, so stand on the inner half of your tower. Earth around Kefka = an AoE over the inner half, so stand on the outer half. Check his effect while you walk to your tower.
 Lightning Resistance DownTwo playersYour matching element is unsafe.Find a lit tower of that element, take the next lit tower clockwise.
 Ice Resistance DownTwo playersYour matching element is unsafe.Find a lit tower of that element, take the next lit tower clockwise.
 Fire Resistance DownTwo playersYour matching element is unsafe.Find a lit tower of that element, take the next lit tower clockwise.
- Read: Four towers, one element twice. Check Kefka for wind or earth on sets 1 and 3 (Catastrophic Choice).
- Set 1: From your element, the next lit tower clockwise. Doubled element: its pair counts from the right one.
- Sets 2 and 3: Clockwise from your tower to the next lit element you are not vulnerable to.
- No debuff: The leftover tower, the right one of the doubled element.
- After · RaidwideUltima Repeater II Four pulses, then back to role groups for two autos before the exaflares.
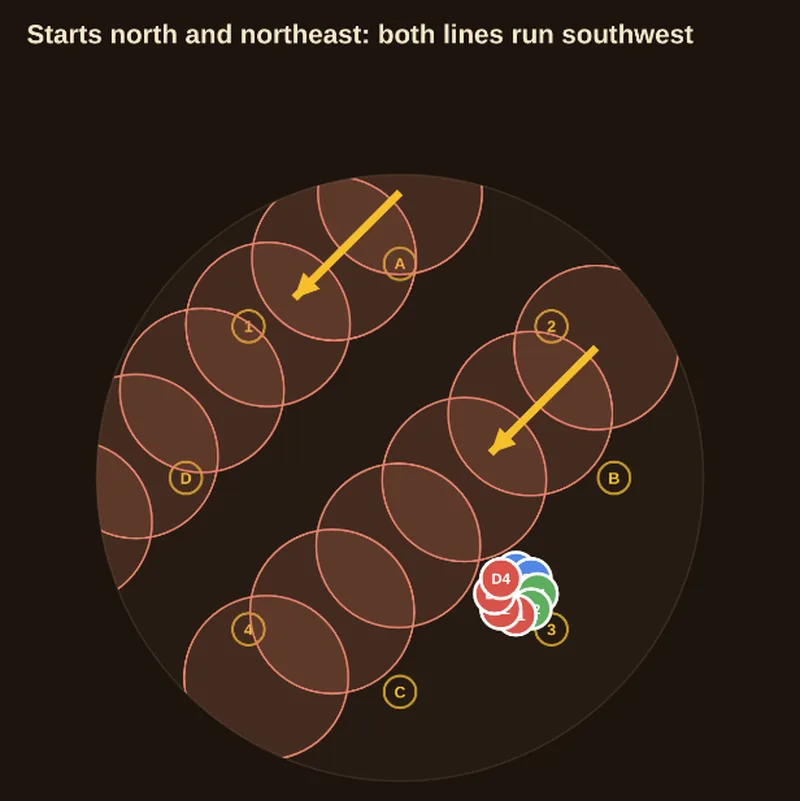
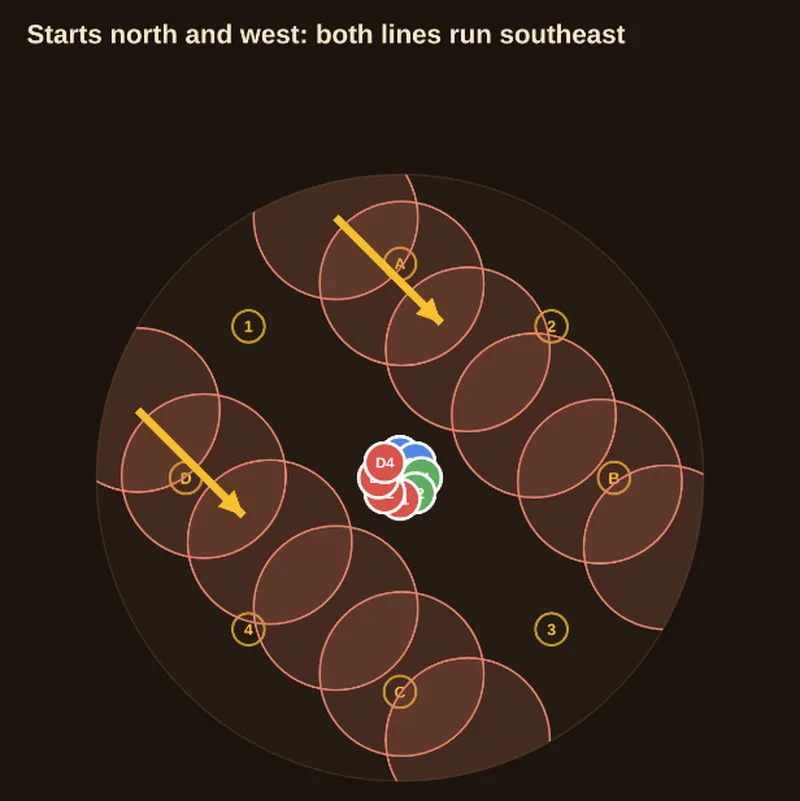
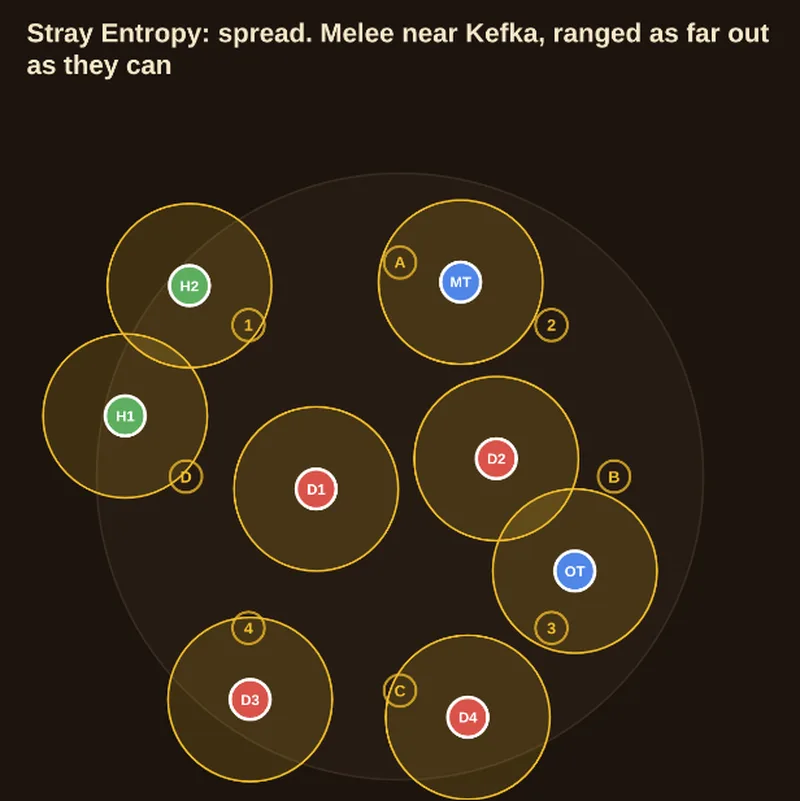
20Stray Apocalypse and Stray EntropyTrack the alternating exaflares, then spread right after the sixth.
- Exaflares: two lines at a time, from the north edge: either north + northeast running southwest, or north + west running southeast.
- Stray Entropy: spread right after the last line. Ranged take the far spots.
Stray Entropy
Leave the last safe lane for your spread. Ranged players take the farthest available space.
21Maddening Orchestra IITwo single tank busters, then a shared one. The three unhit players bait.
- Same as Orchestra I: two single tank busters, then a shared one; the three missed non-tanks bait.
- Swap: this time MT keeps first enmity and takes Flare to the edge. OT invulns Holy.
- After: three autos.
Each tank first takes a single buster (stay apart), then the tanks stack for a shared buster. The three non-tanks missed by the first circles move close to bait the next set. MT keeps first enmity and takes Flare to the edge. OT invulns Holy. Three autos follow.
Flare markerTank first in enmity at assignmentA large blast follows the holder.Take it to the outer edge.Holy markerTank second in enmity at assignmentA shared hit overlaps Flare.Invuln Holy.- Busters: One on each tank, then a shared one.
- Bait: The three unhit players bait the second AoEs.
- Separate: The Holy tank invulns and holds the boss.
Group both healers south. Put one melee and one ranged on each side, west and east. The three players who missed the first circles still bait next.
- Set roles: Keep one melee and one ranged on each side.
- Bait: The three unhit non-tanks bait.
- Resolve: Send Flare to the edge and invuln Holy.
22Forsaken and Forsaken NullStart at 2 and move a quarter-turn clockwise on each stack marker.
- Start: mitigate the raidwide when the cast ends and gather at 2.
- Move: a quarter-turn clockwise on each stack marker. Jump puddles if you have to.
- Finish: on the final marker run to the only safe cardinal, and kill Kefka before Forsaken Null finishes.
Mitigate the cast-end raidwide and gather at 2. Move on the stack marker, jumping puddles if needed. On the final marker run to the only safe cardinal and kill before Forsaken Null finishes.
- Start: Wait together at the northeast number.
- First marker: The centre and number markers get puddles.
- Third marker: One number and one cardinal get puddles.
- Final marker: Run directly to the last safe spot.
JP vs NA vs EU
| Mechanic | JP (this guide) | NA (Kefkabin) | EU (LPDU) |
|---|---|---|---|
| Tele-trouncing | Red or blue, melee inside | Merry-Go-Round | Big Box (LPDU): check the PF description |
| Trine | Party S then E, tanks N then W | Party N CW, Tanks NW CCW | Ask in PF |
| Forsaken | Stack pairs 1–3 and 8, H > T > melee > ranged | AAABBBBA, 3-4-1 melee flex | Modified ABBA / LPDU Buddies |
| Bowels of Agony | Tank LB3 during Vacuum Wave | Tank LB3 BoA | Ask in PF |
| Black Hole | Attack, bind, stop swaps | Old BH, DPS > support > Accretion | Ask in PF |
| Stomp-a-Mole | Paired quadrants from last cut | New Stompies, supports N / DPS S | Ask in PF |
| Kefka Says | Beam-relative spreads, personal echo reminders | Self Mark, gaze supports N / DPS S | Ask in PF |
| Maddening Orchestra | Swap for first Holy, OT invulns second | Healers South | Ask in PF |
| Final Forsaken | Start 2, move clockwise | Static Forsaken Null: confirm route | Ask in PF |
| Burst | 0-second opener | Ikuya mitigation sheet: confirm opener | Ask in PF |
Ask in PF wherever a regional route is unconfirmed.
Loot and rewards
 Mad Harlequin's TotemTrade it to Uah'shepya in Solution Nine (X:8.7 Y:13.5) for a Palazzo Diamond weapon. No weekly limit since Patch 7.58.
Sources
Feature details are checked against official documentation. Checklists and practice suggestions are written by Vtomes.
- Square Enix (Lodestone): Patch 7.51 notes
- Square Enix: Patch 7.5 special site, Dancing Mad (Ultimate)
- XIVAPI: official FFXIV status names, tooltips and icons
- JP strat, phase timeline and positions
- Dancing Mad (Ultimate)
- P1 role lineup
- P1 tank handoff
- Puzzle conditions and status labels
- Regional teleport plans
- Forsaken assignments and tower baits
- EU tower and flex assignments
- P3 swaps and markers
- P3 status descriptions and NA assignments
- P4 debuffs, real or fake rules and cast order
- P4 personal echo reminders
- Forsaken: stored icons and tower order
Image sources: Vtomes · FINAL FANTASY XIV © 2010 - 2026 SQUARE ENIX CO., LTD. All Rights Reserved.